TCN
Settings for your TCN vending machine
Which steps you need depends on the control panel of your TCN machine. First choose your device type – below it you will find the settings and, where needed, the update guides.
Device type 1
TCN with keypad
These settings apply to all TCN machines with a keypad from software version BT5M24052.35-V09.
Finding the software versionYou will find your software version in the standard menu under the menu tab Sys. Setting in the sub-item About this Machine.
Settings on the machine
Open the machine
Open your machine.
Open the standard menu
Open the standard menu with the password 000000 and confirm with Enter.
Set the parameter
Select the menu tab Sale_Payment, then the sub-item Set IC Card Reader:
Restart the machine
Switch the machine off at the main switch and then on again.
Then configure the following settings in the SENVEND APP my.senvend and press Save:
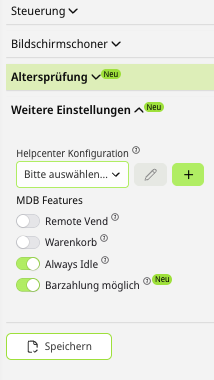
Shopping cart and multiple vendUsing the shopping cart function or multiple vend is currently not recommended.
Age verification
Minimum versionFor age verification the SENVEND app should be on at least version 1.3.15 or higher.
Open the machine
Open your machine.
Open the admin menu
Open the admin menu with the password 80515 and confirm with Enter.
Set the parameter
Set the following parameter:
Restart the machine
Switch the machine off at the main switch and then on again.
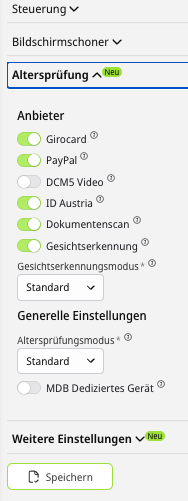
Only one system at a timeTwo different age verification systems cannot be used in parallel – for example SENVEND and an external age verification system.
Then configure the following settings in the SENVEND APP my.senvend and press Save:
Updating the keypad machine
If your machine has an older software version, the update runs via TCN aftersales service:
Insert a SIM card
Insert a SIM card without a PIN into your machine.
Contact TCN aftersales
Message TCN aftersales on WhatsApp that you need an update and tell them your machine ID as well. You will find the machine ID in the machine menu under About this Machine.
Device type 2
TCN Touch
These settings apply to all TCN machines with a large touch display.
Settings on the touch display
Activate MDB payment
Open the backend management
Go to Backend-Management.
Open the payment methods
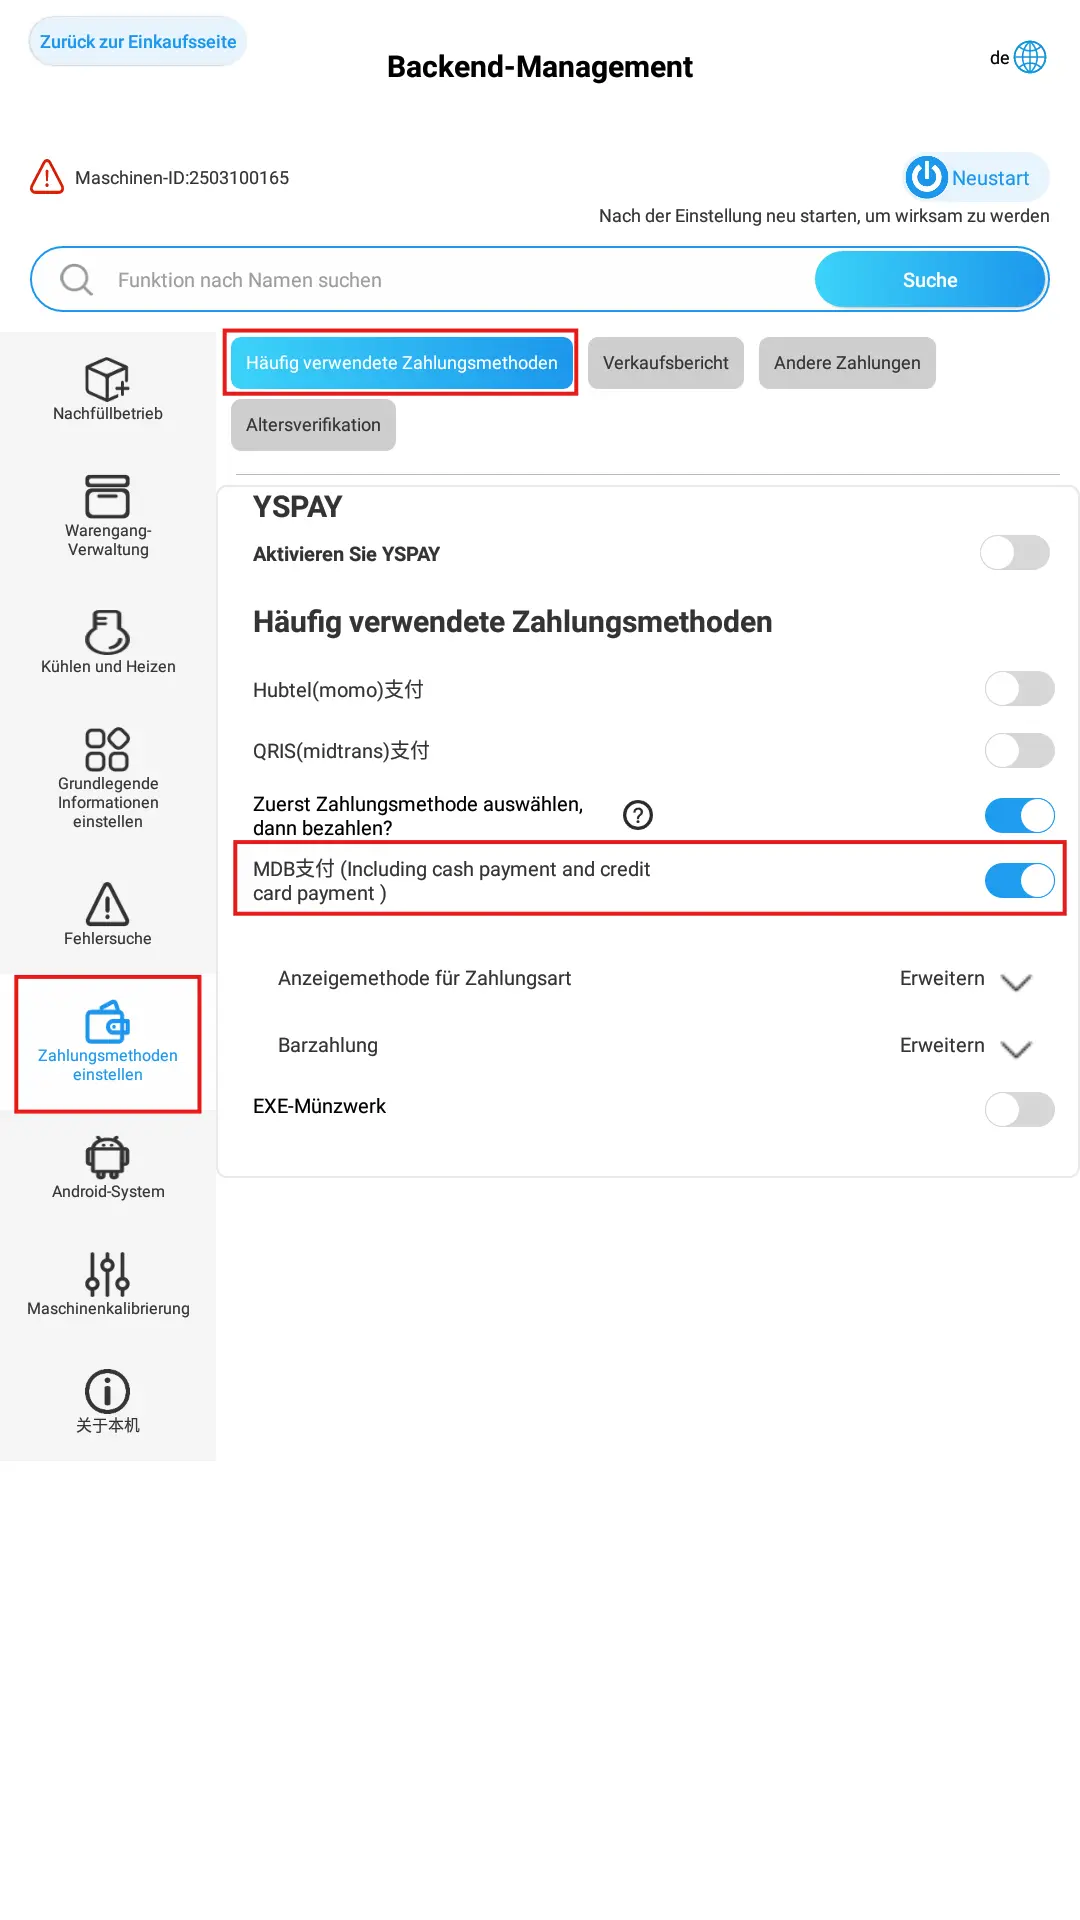
In the menu on the left, press the menu item Zahlungsmethoden einstellen (set payment methods).
Choose the submenu
Select the submenu item Häufig verwendete Zahlungsmethoden (frequently used payment methods).
Activate MDB
Activate MDB (including cash payment and credit card payment) with the slider.
Activating or deactivating age verification
Only activate if neededOnly activate this setting if you want to use age verification. If not, check that the following settings are deactivated.
Open the backend management
Go to Backend-Management.
Open the payment methods
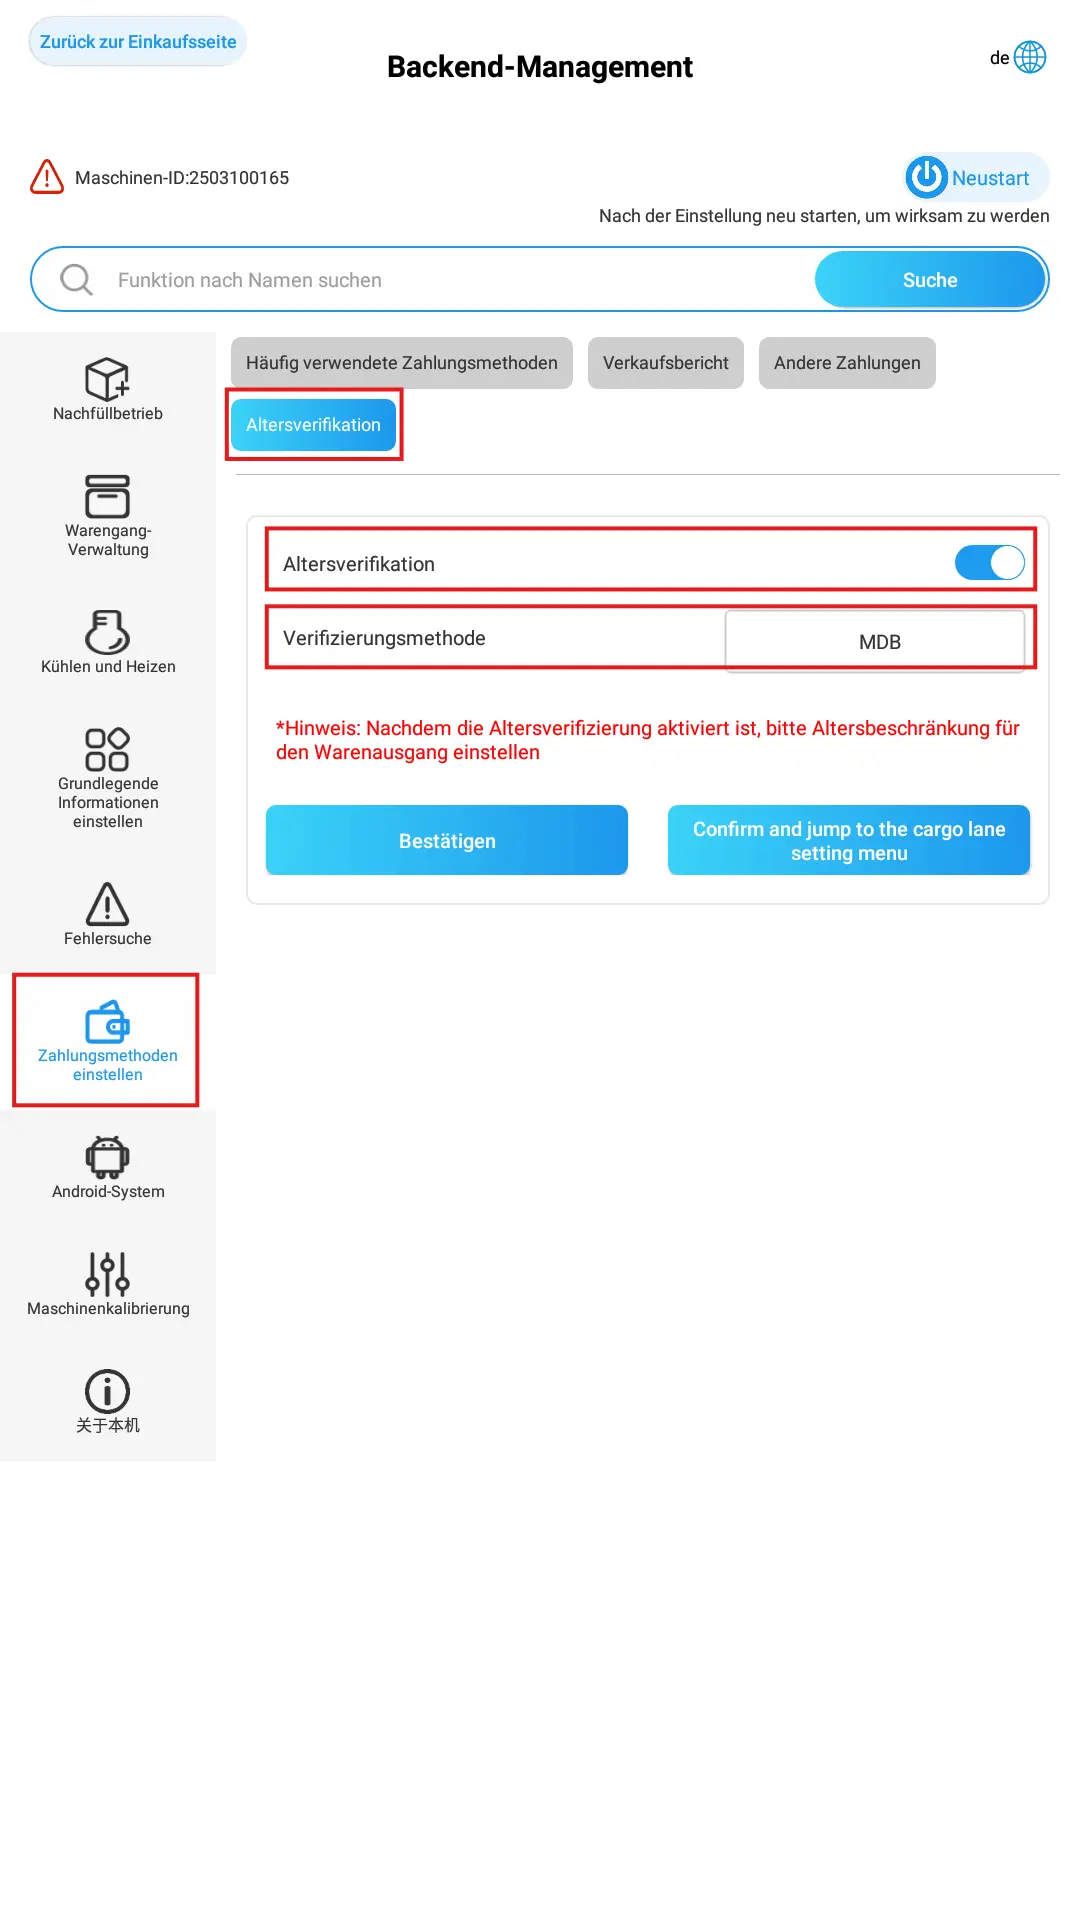
Press the menu item Zahlungsmethoden einstellen (set payment methods).
Choose the submenu
Select the submenu item Altersverifikation (age verification).
Activate age verification
Activate Altersverifikation (age verification) with the slider.
Choose the verification method
Select MDB as the verification method.
Restart afterwardsAfter making these settings we recommend restarting the whole machine.
Updates for the touch machine
Only for touch machines with a liftThe updates are currently only available for touch machines with a lift – and only the tile interface works.
Here you will find the current firmware files:
MDB-Firmware Touch Touch firmware (TCN shop system)
Not the SENVEND StorefrontThe storefront update described here refers to the TCN shop system – not to SENVEND Storefront. The guides for SENVEND Storefront will follow later.
Can't find the settings?If individual settings for the MDB update cannot be found, set the machine language for the update to Englisch (English). The options should then appear.
MDB update
Insert the USB stick
Insert the USB stick into the machine. Make sure the stick contains only the update files and nothing else.
Open the backend management
Open the menu Backend Management by tapping repeatedly on the top left corner.
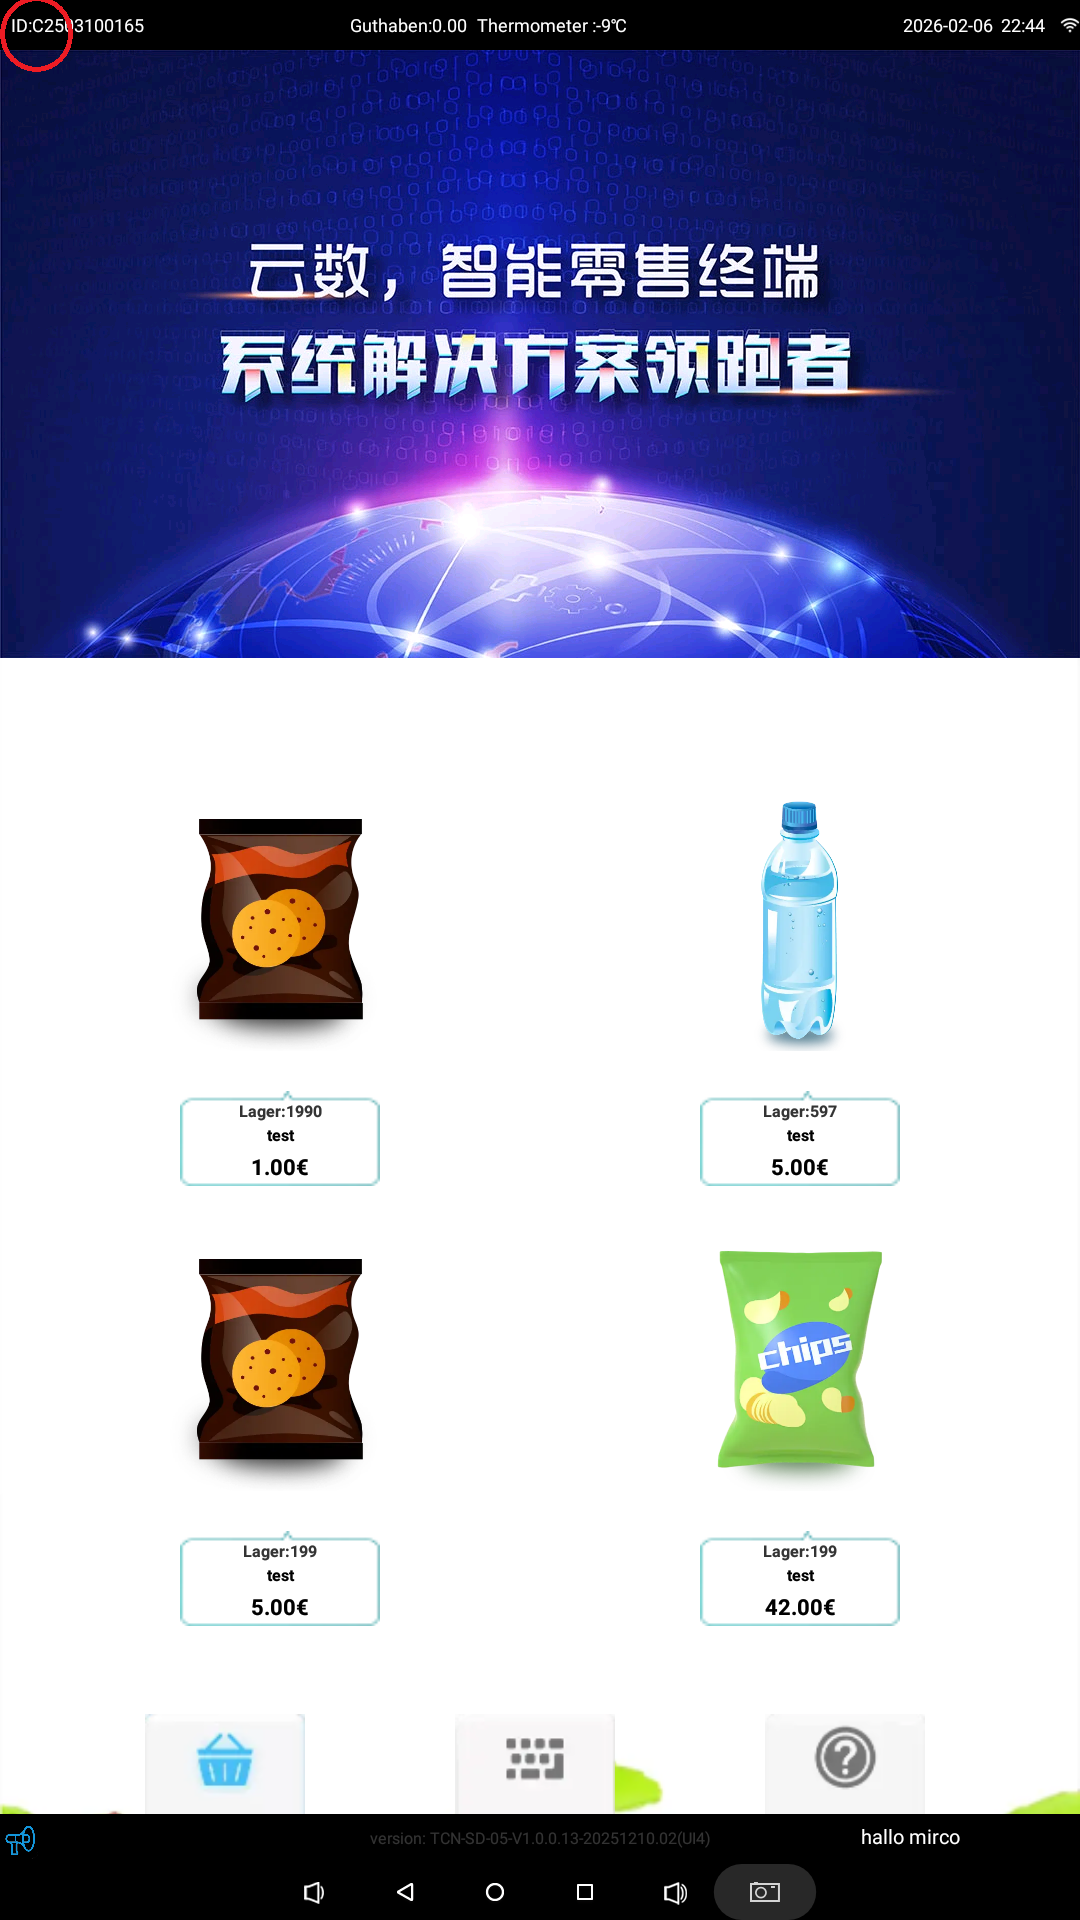
Open the Android settings
Select the submenu Android Einstellungen (Android settings).
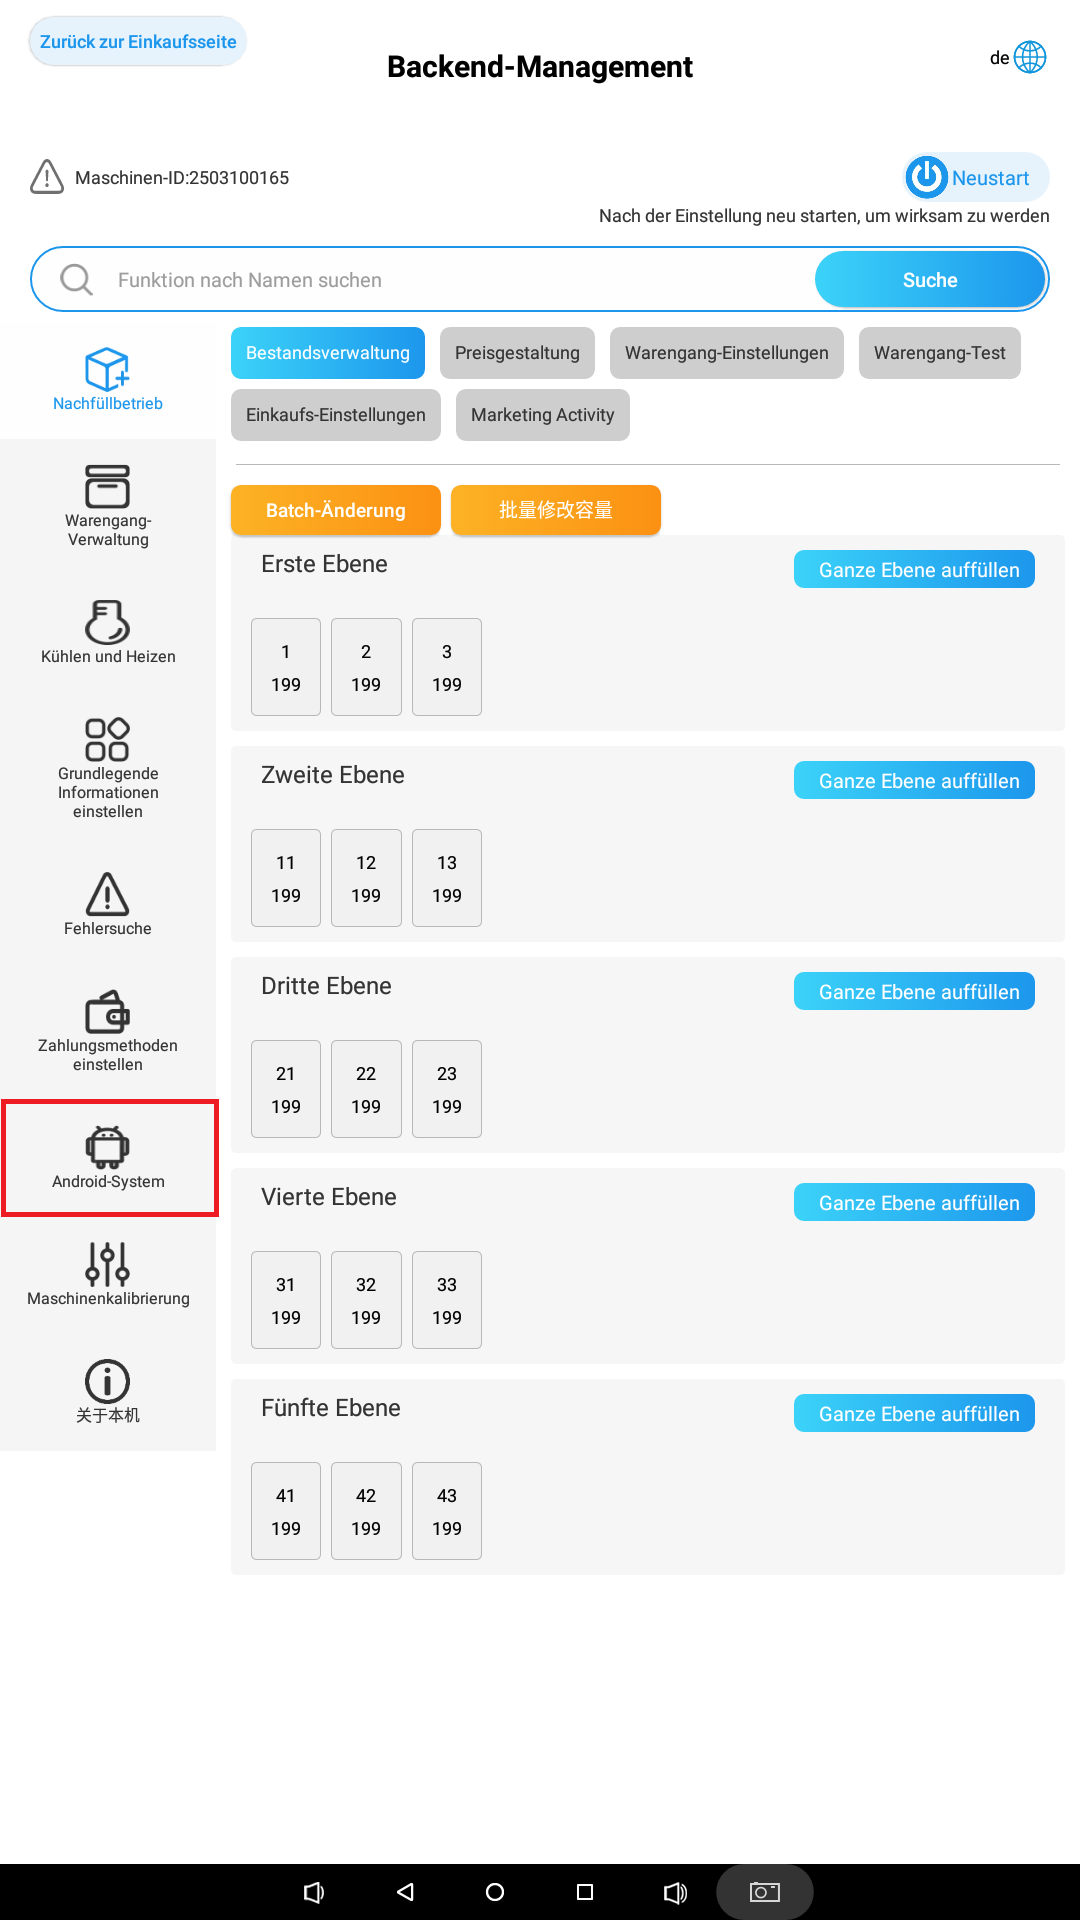
Open the ES browser
Select ES-Browser.
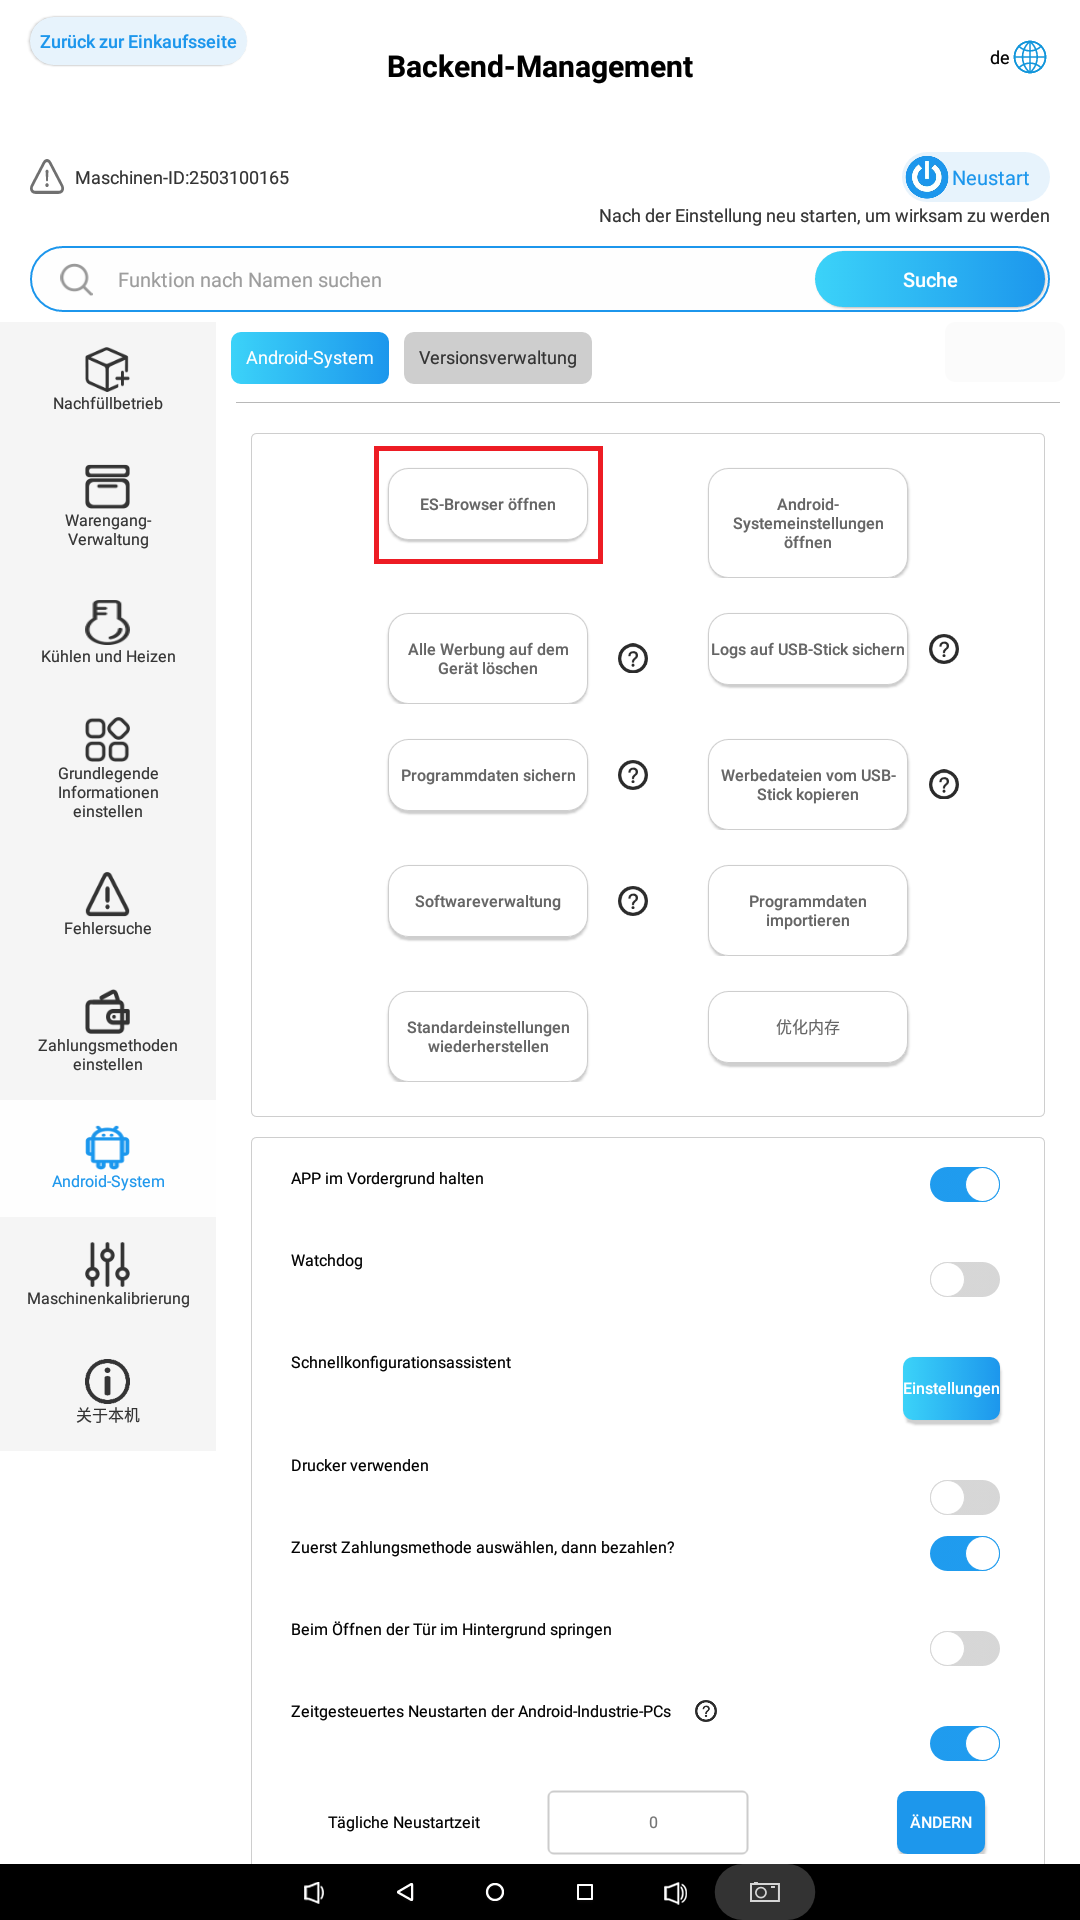
Open the menu
In the ES browser, at the top left press the three bars.
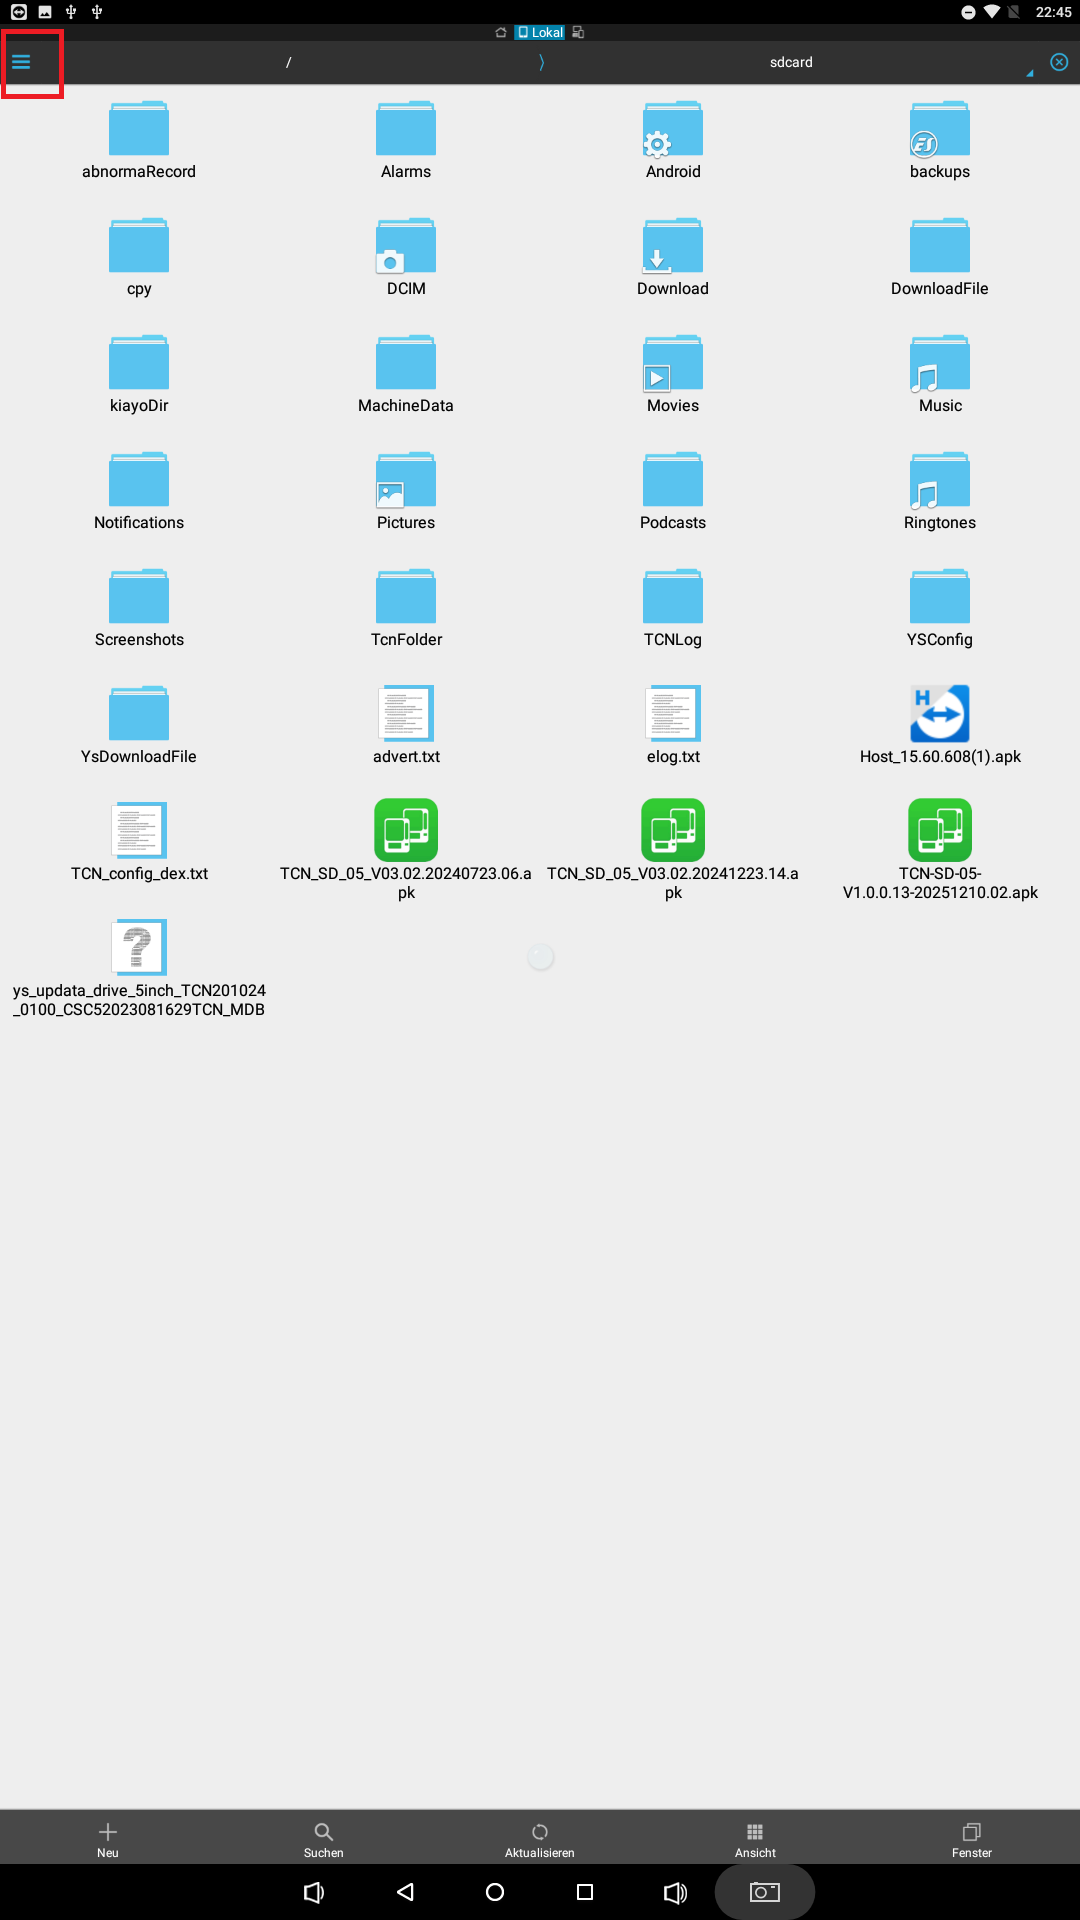
Choose the device portal
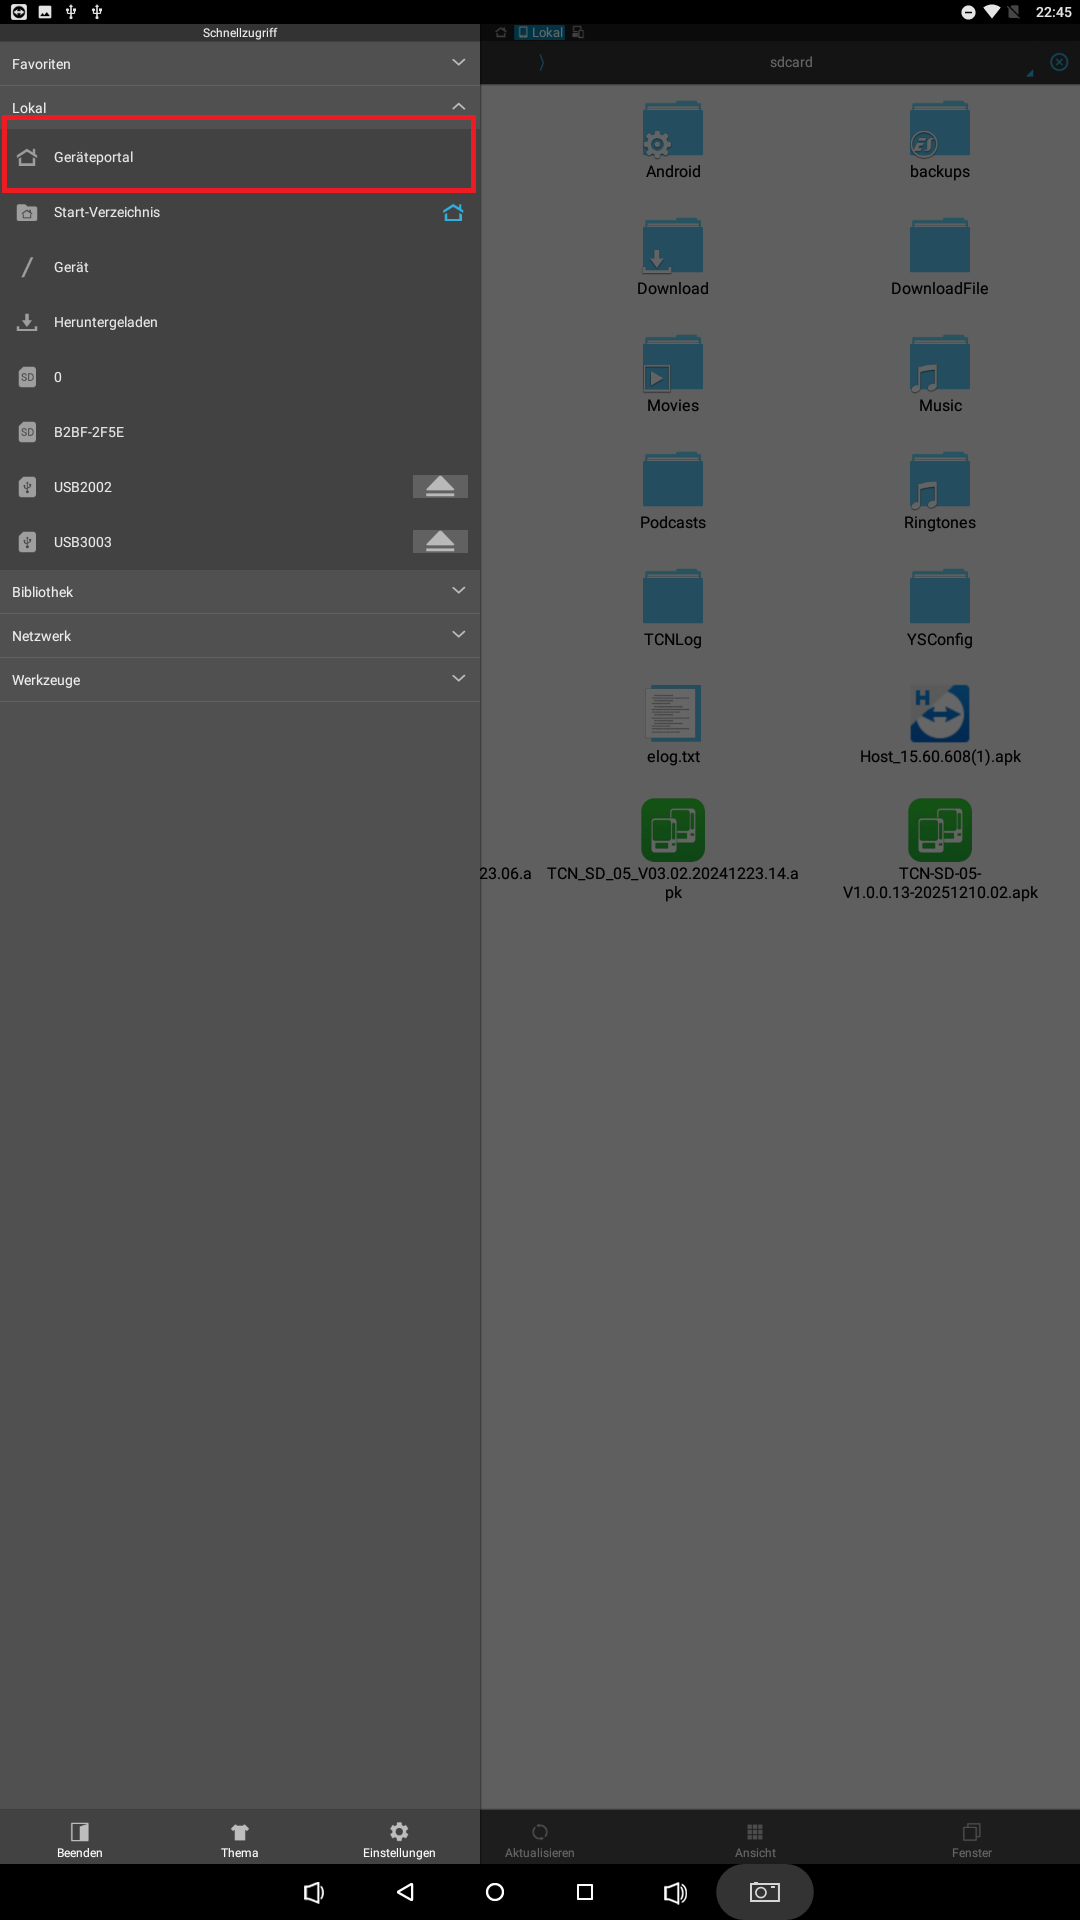
Select Geräteportal (device portal) in the menu.
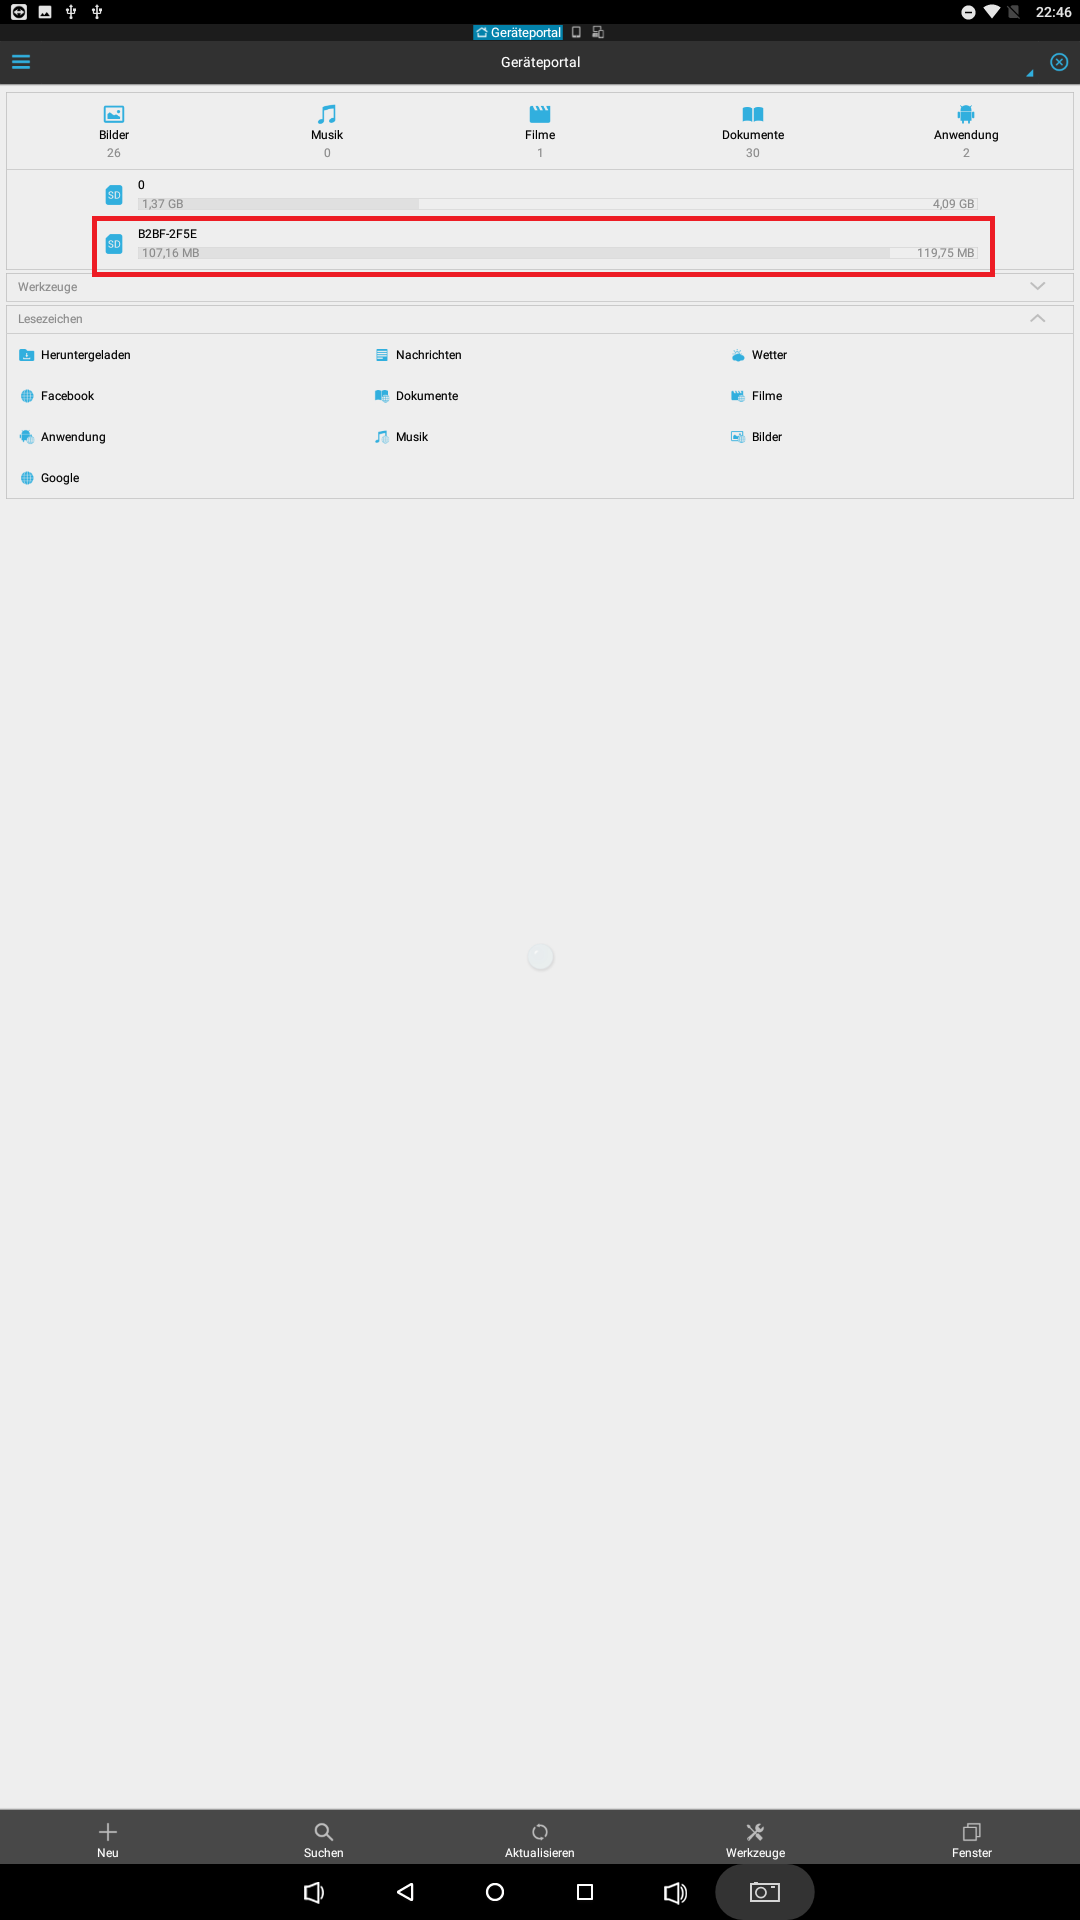
Select the USB stick
Select the USB stick. 0 is always the internal SD card; the stick is below it.
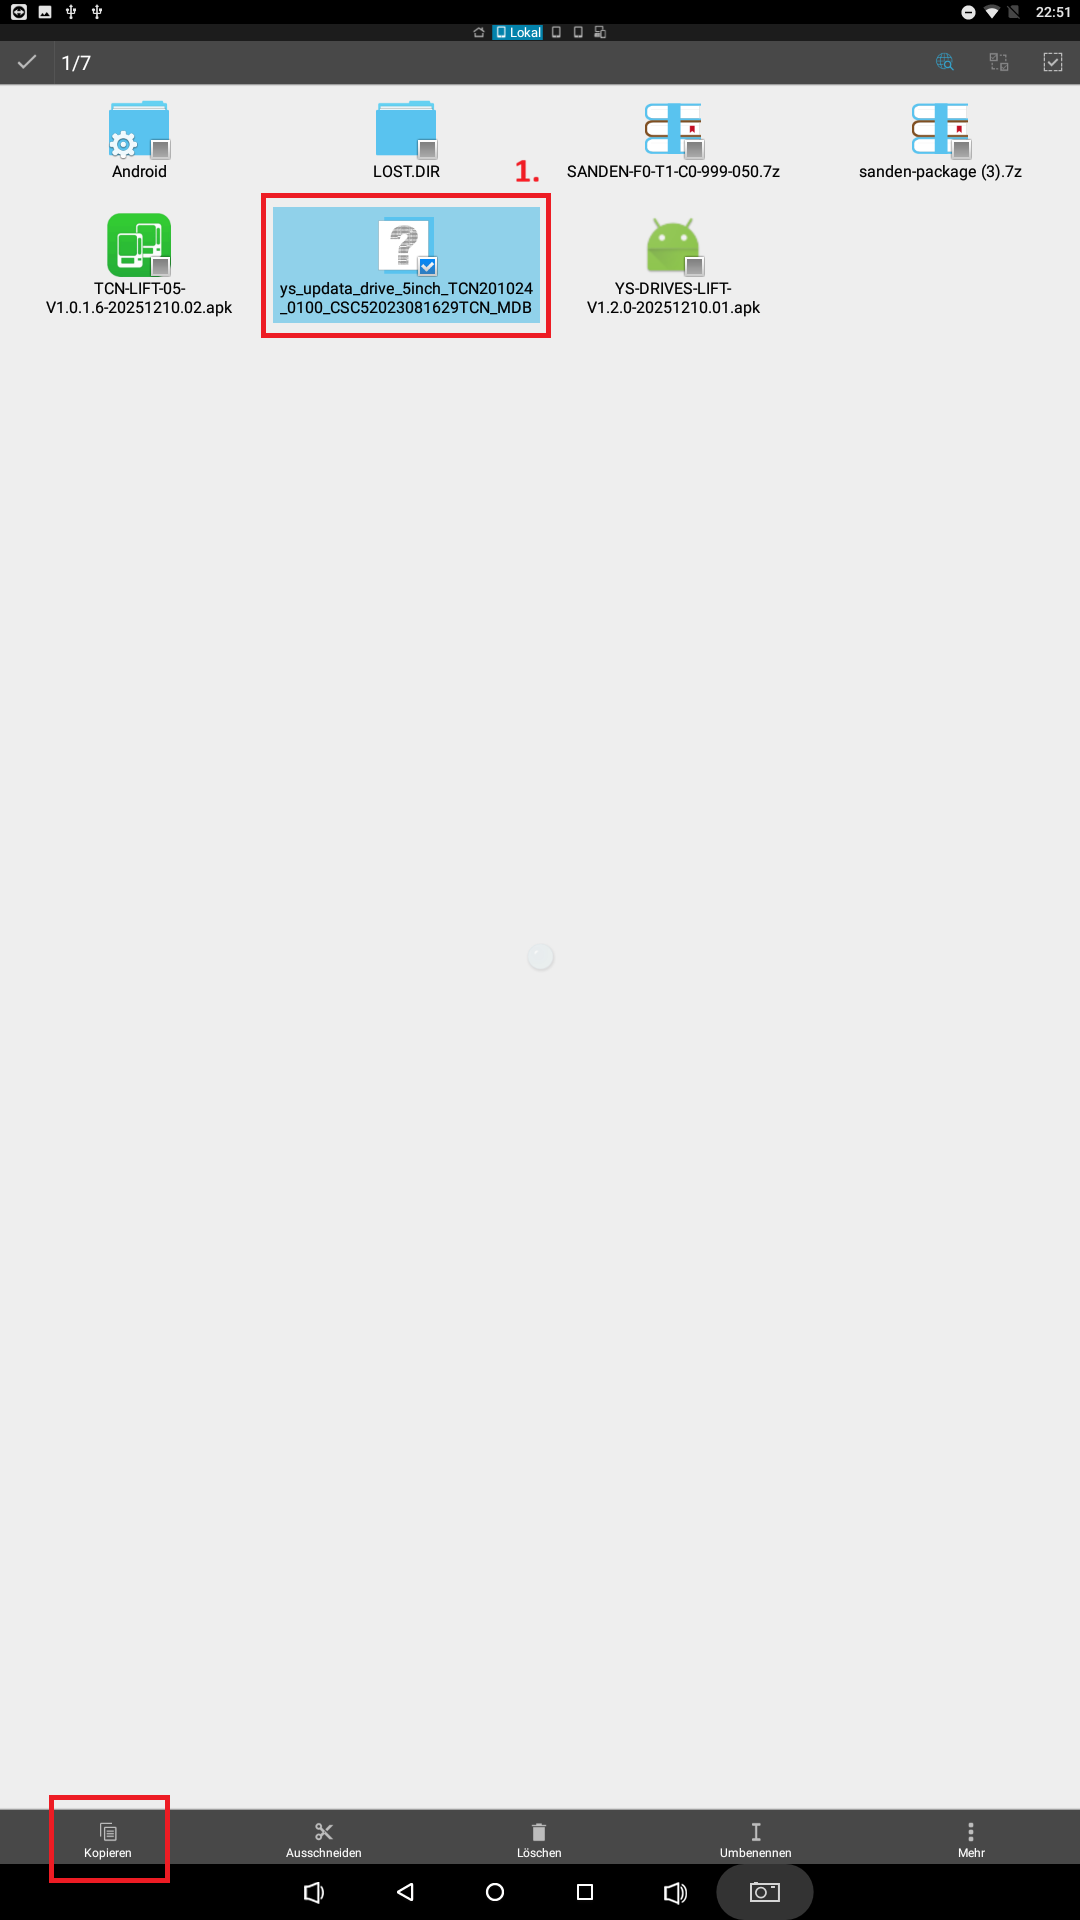
Copy the MDB update
Select the MDB update by pressing and holding it, then copy it.
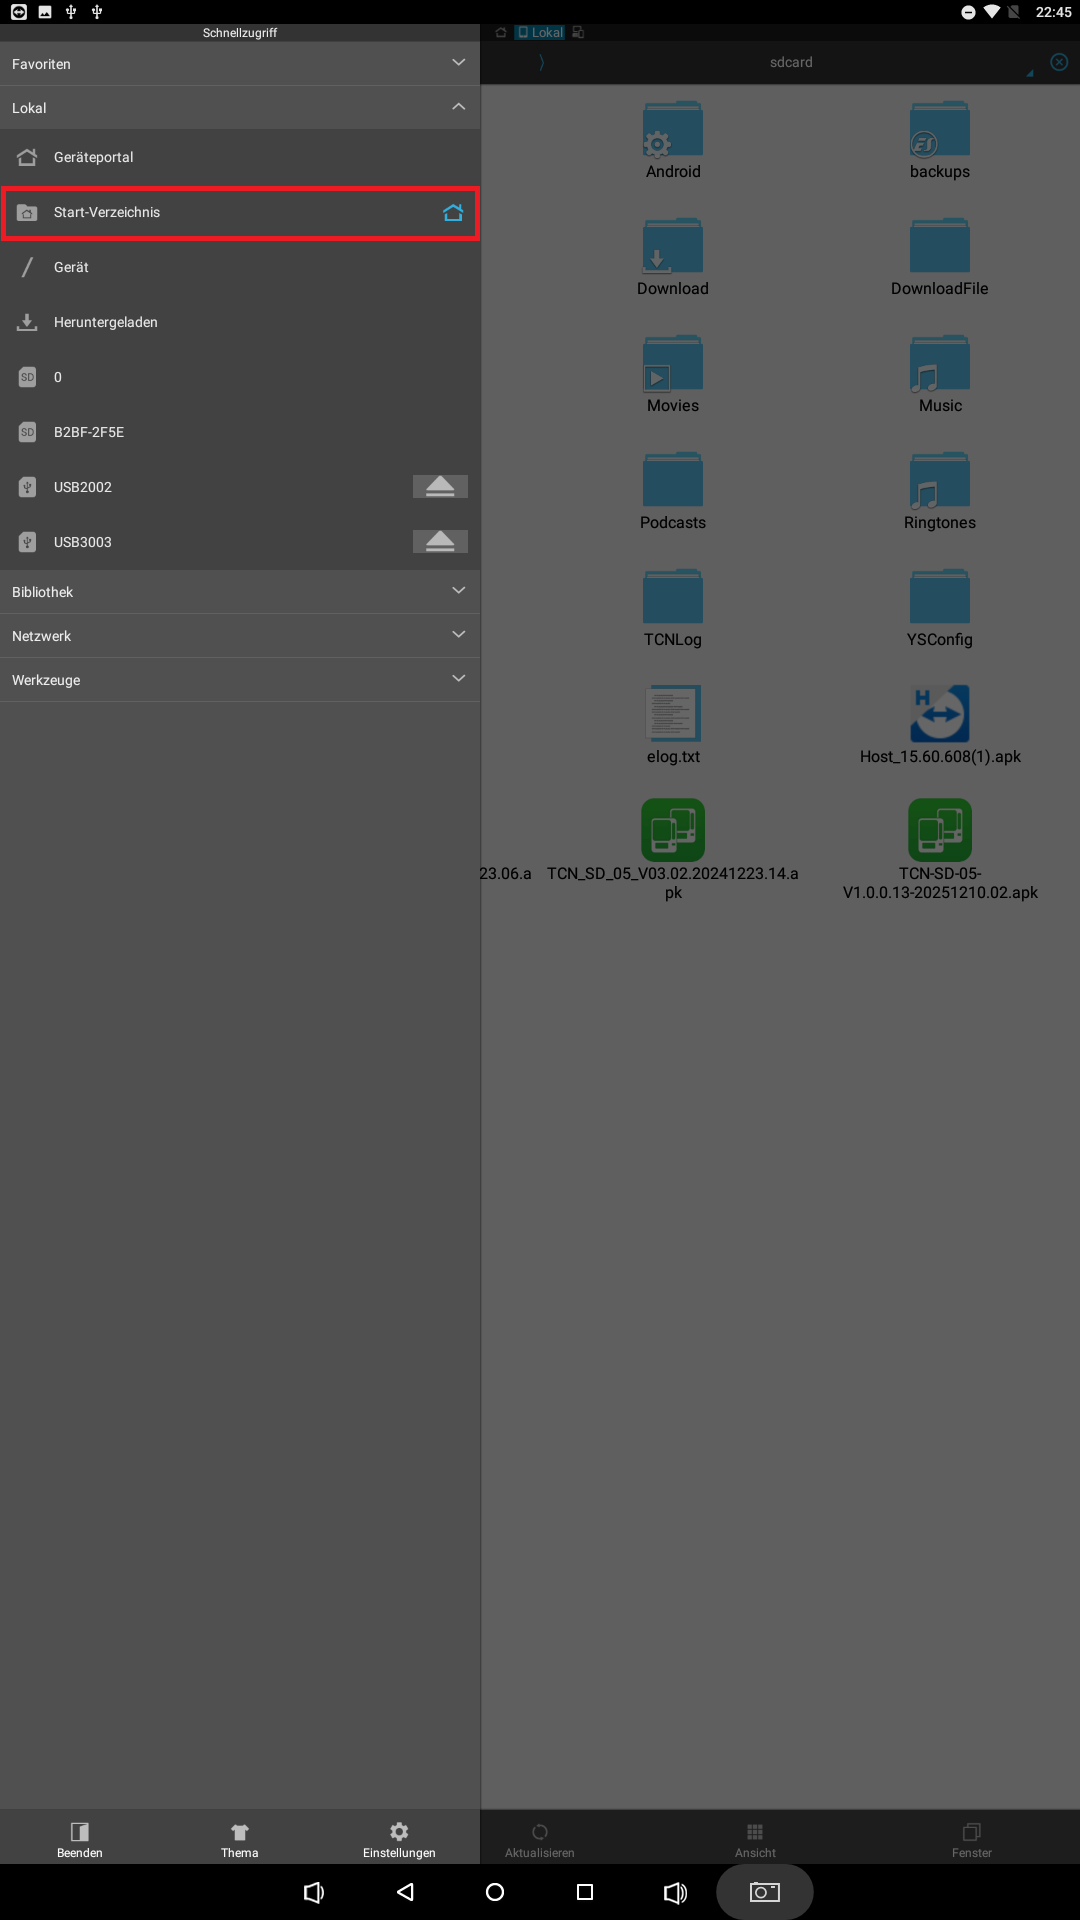
Switch to the root directory
Select the three bars at the top left again and switch to the Start-Verzeichnis (root directory).
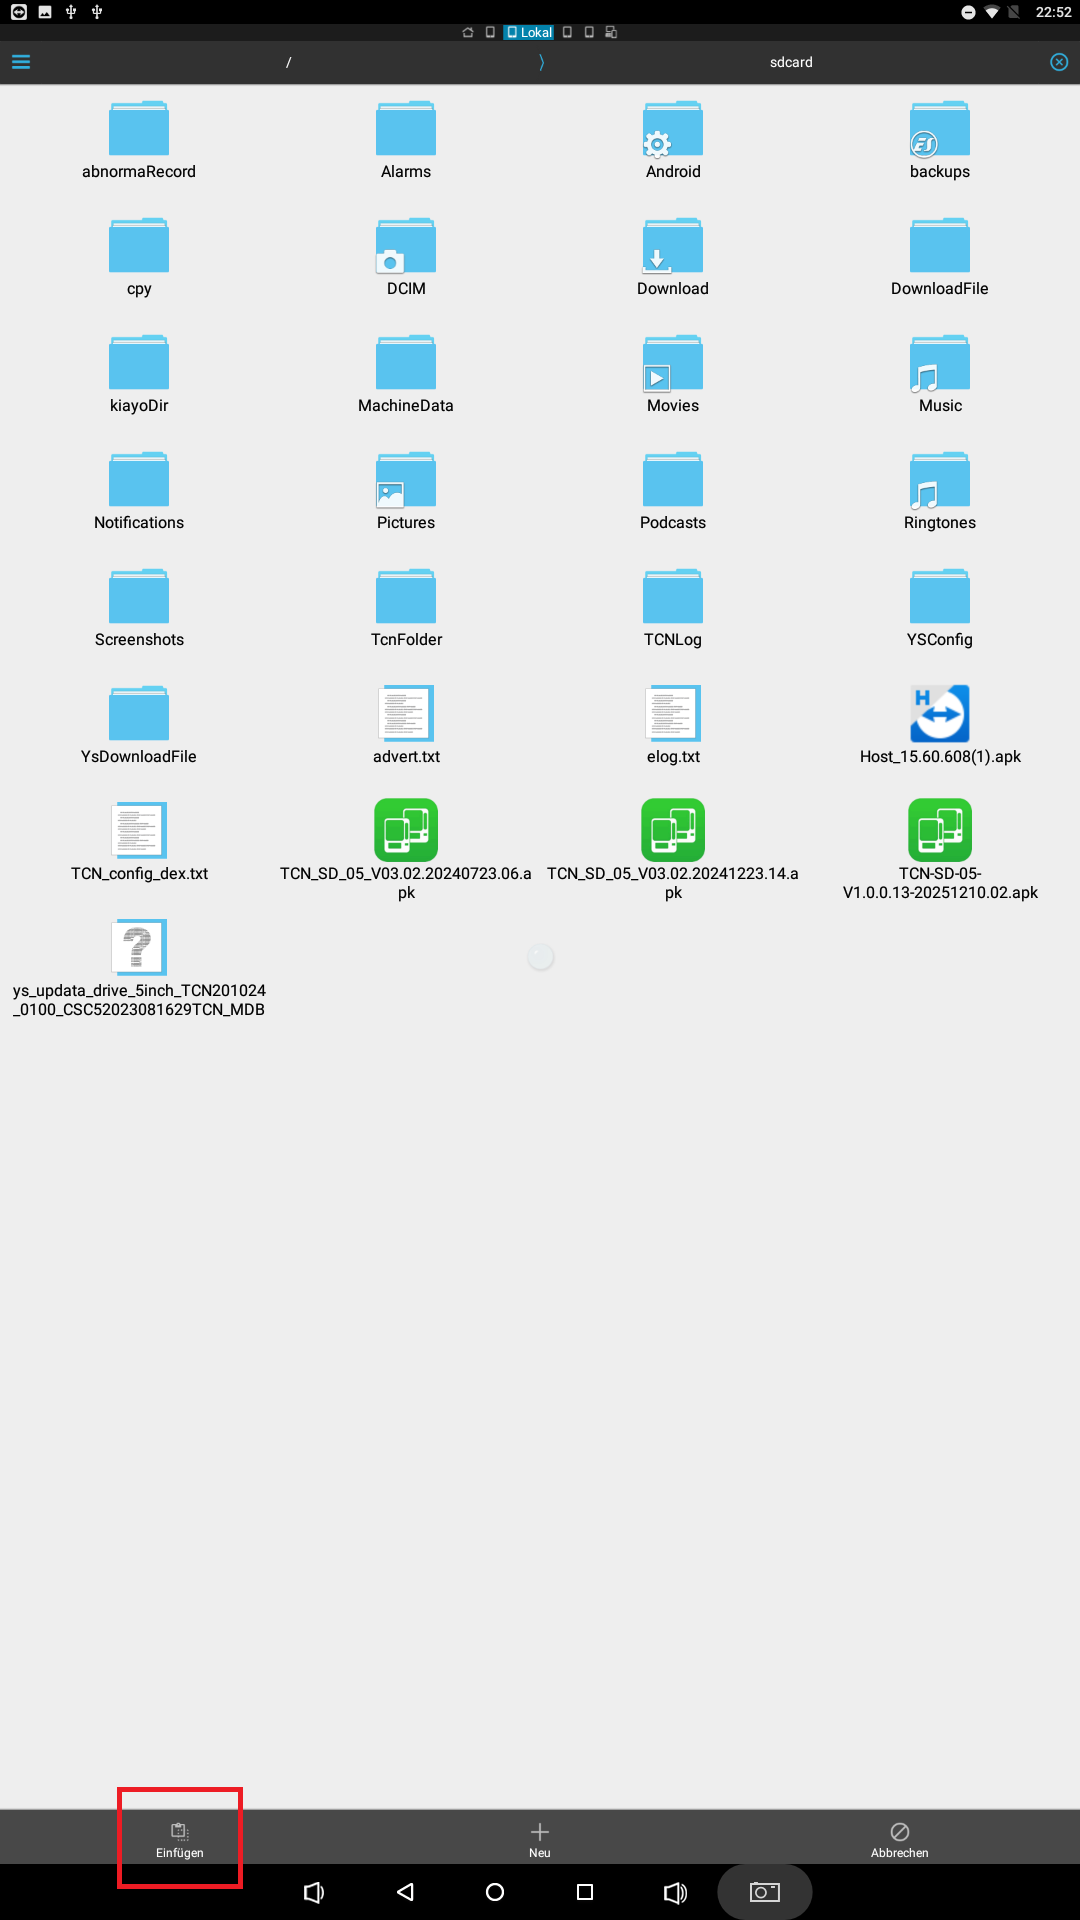
Paste the file
In the root directory, press Einfügen (paste).
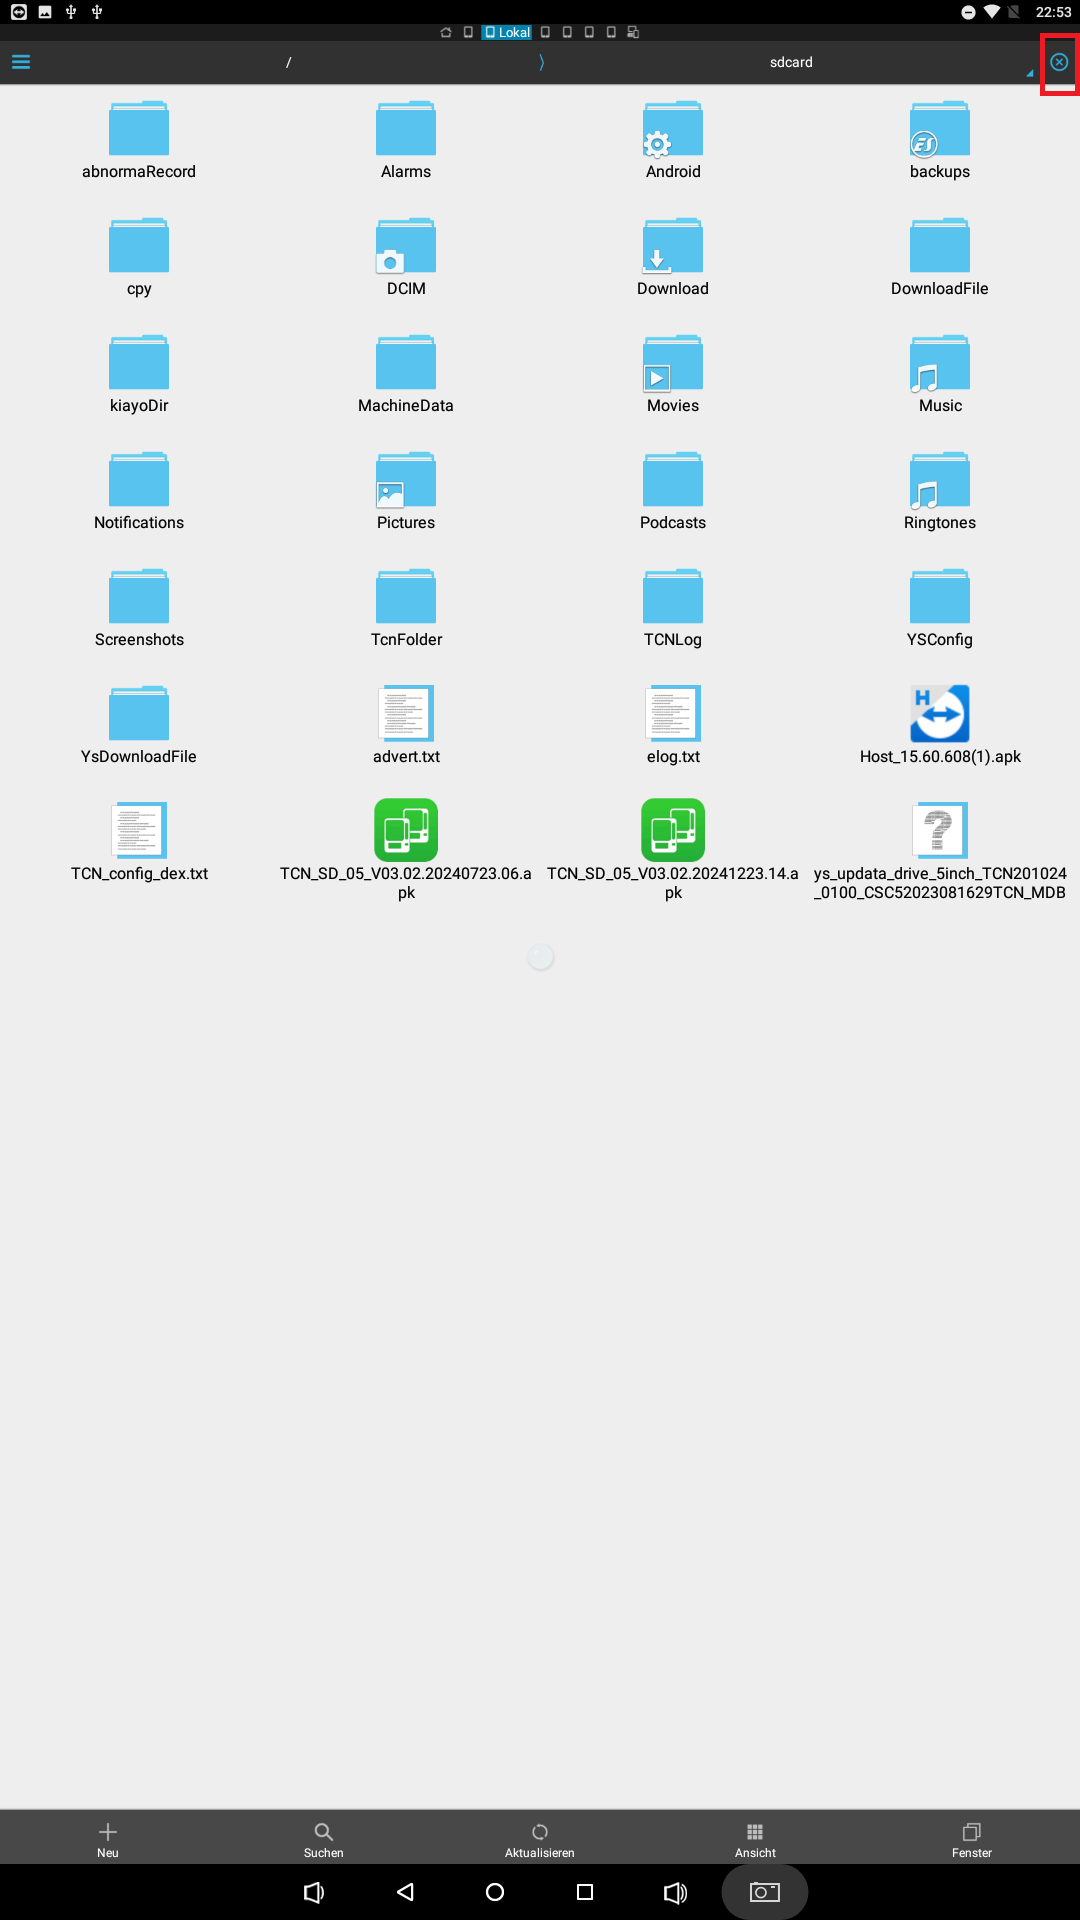
Back to the backend management
Press the X at the top right until the backend management appears again.
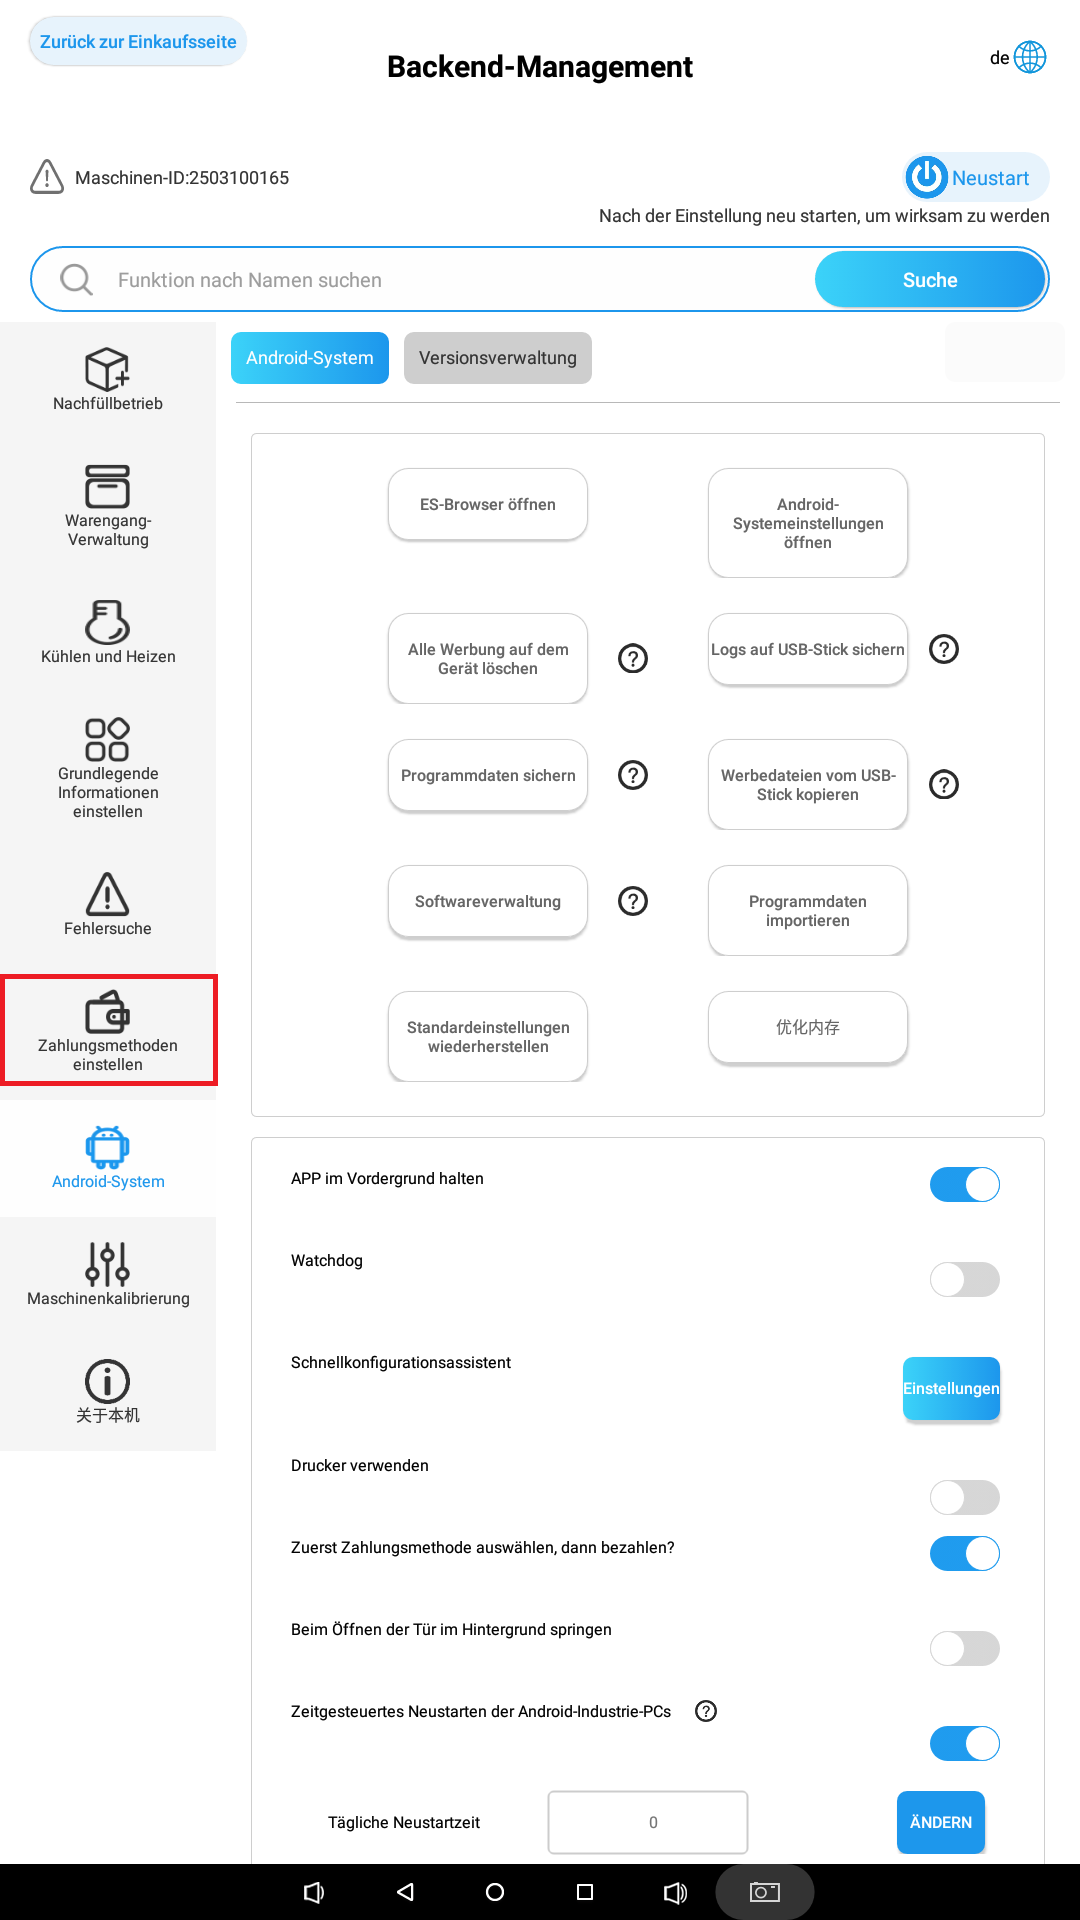
Open the payment methods
In the backend management, go to Zahlungsmethoden einstellen (set payment methods).
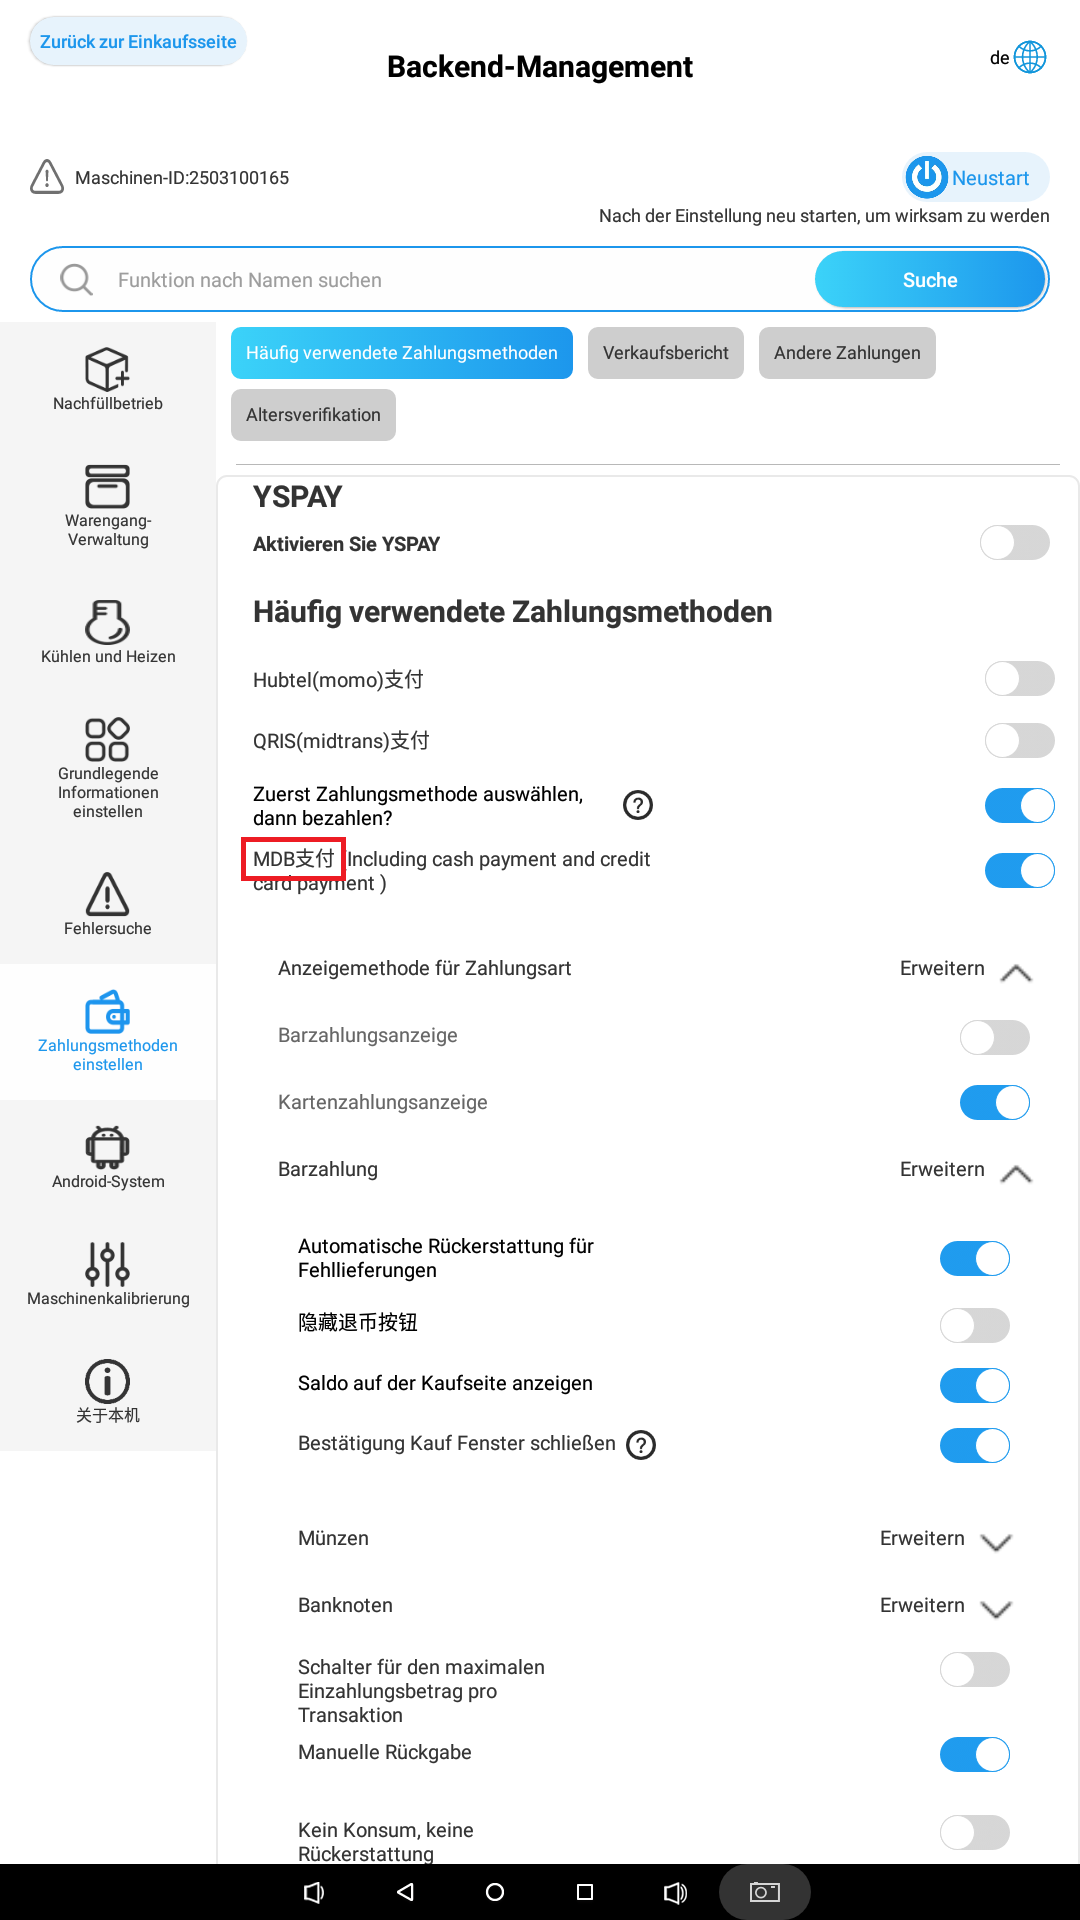
Open the update menu
Tap several times on MDB until the update menu appears.
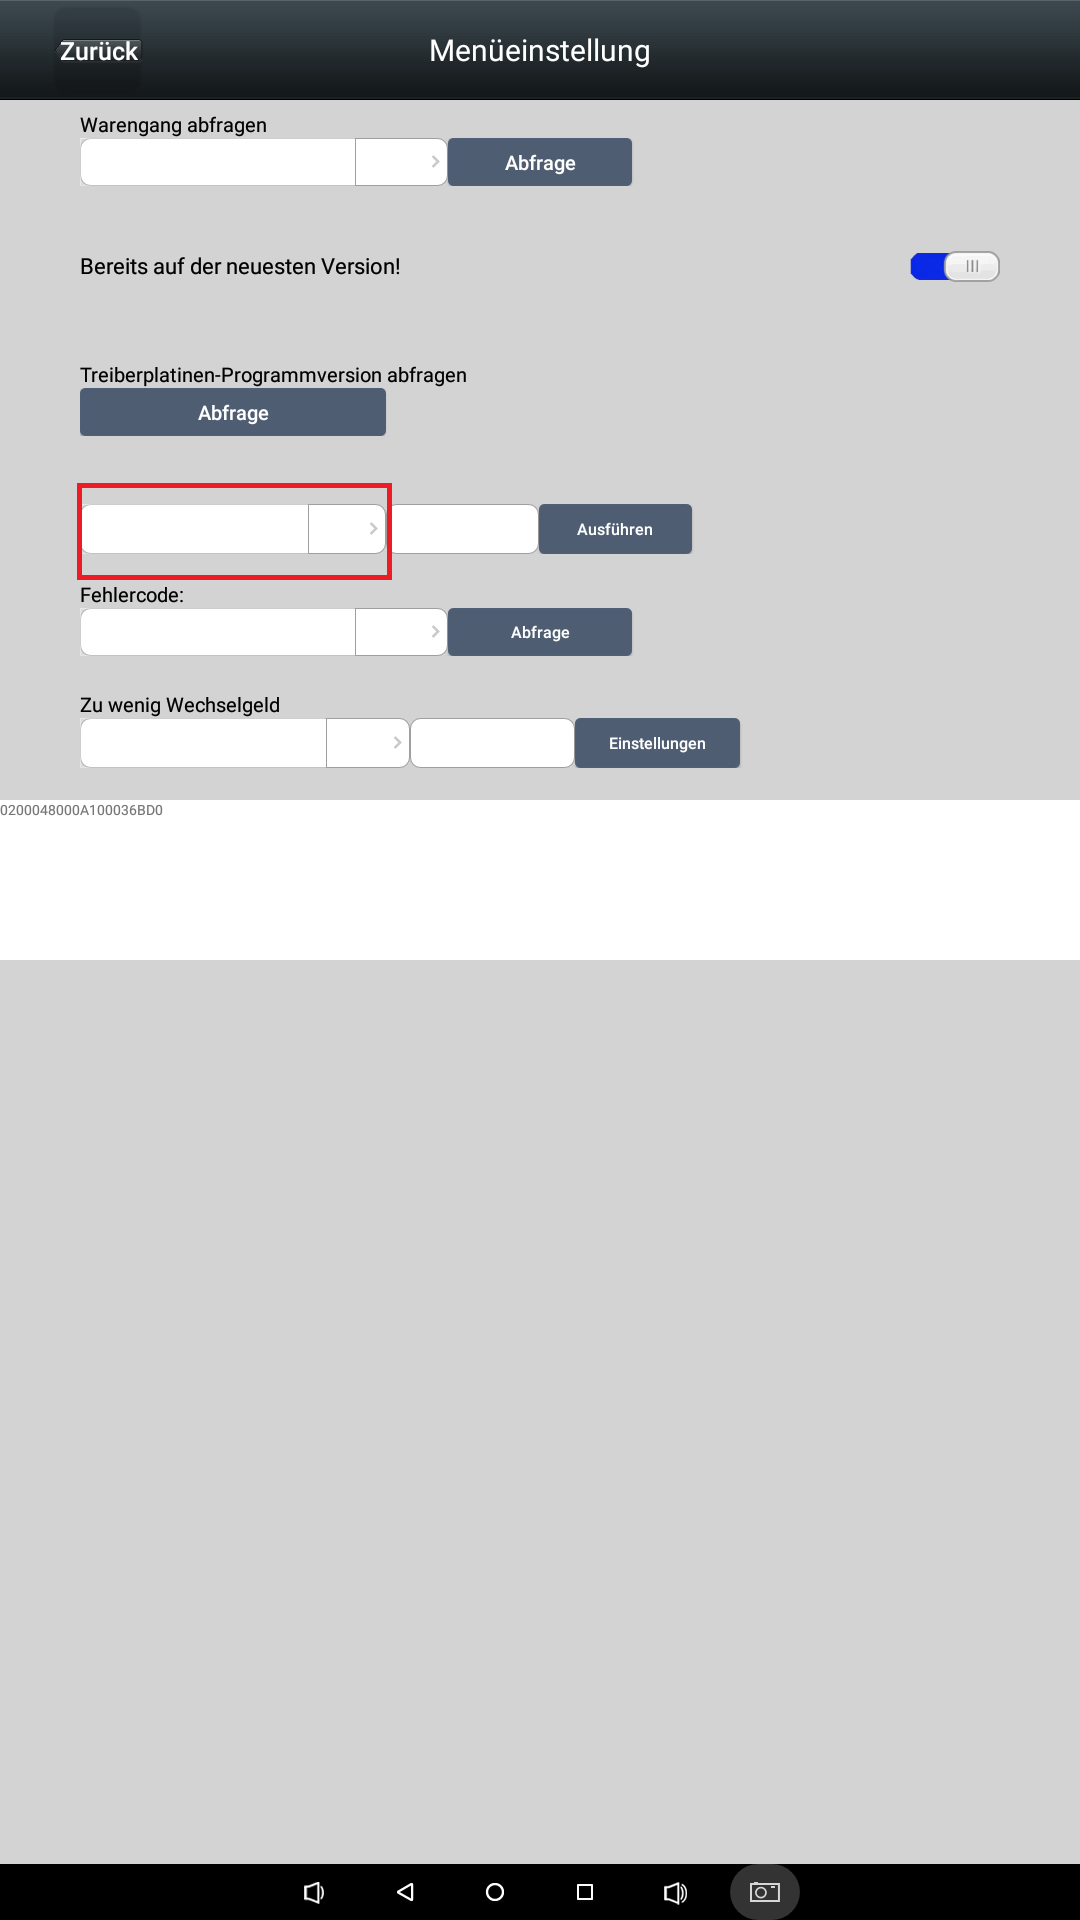
Select the field
In the updater, select the highlighted field.
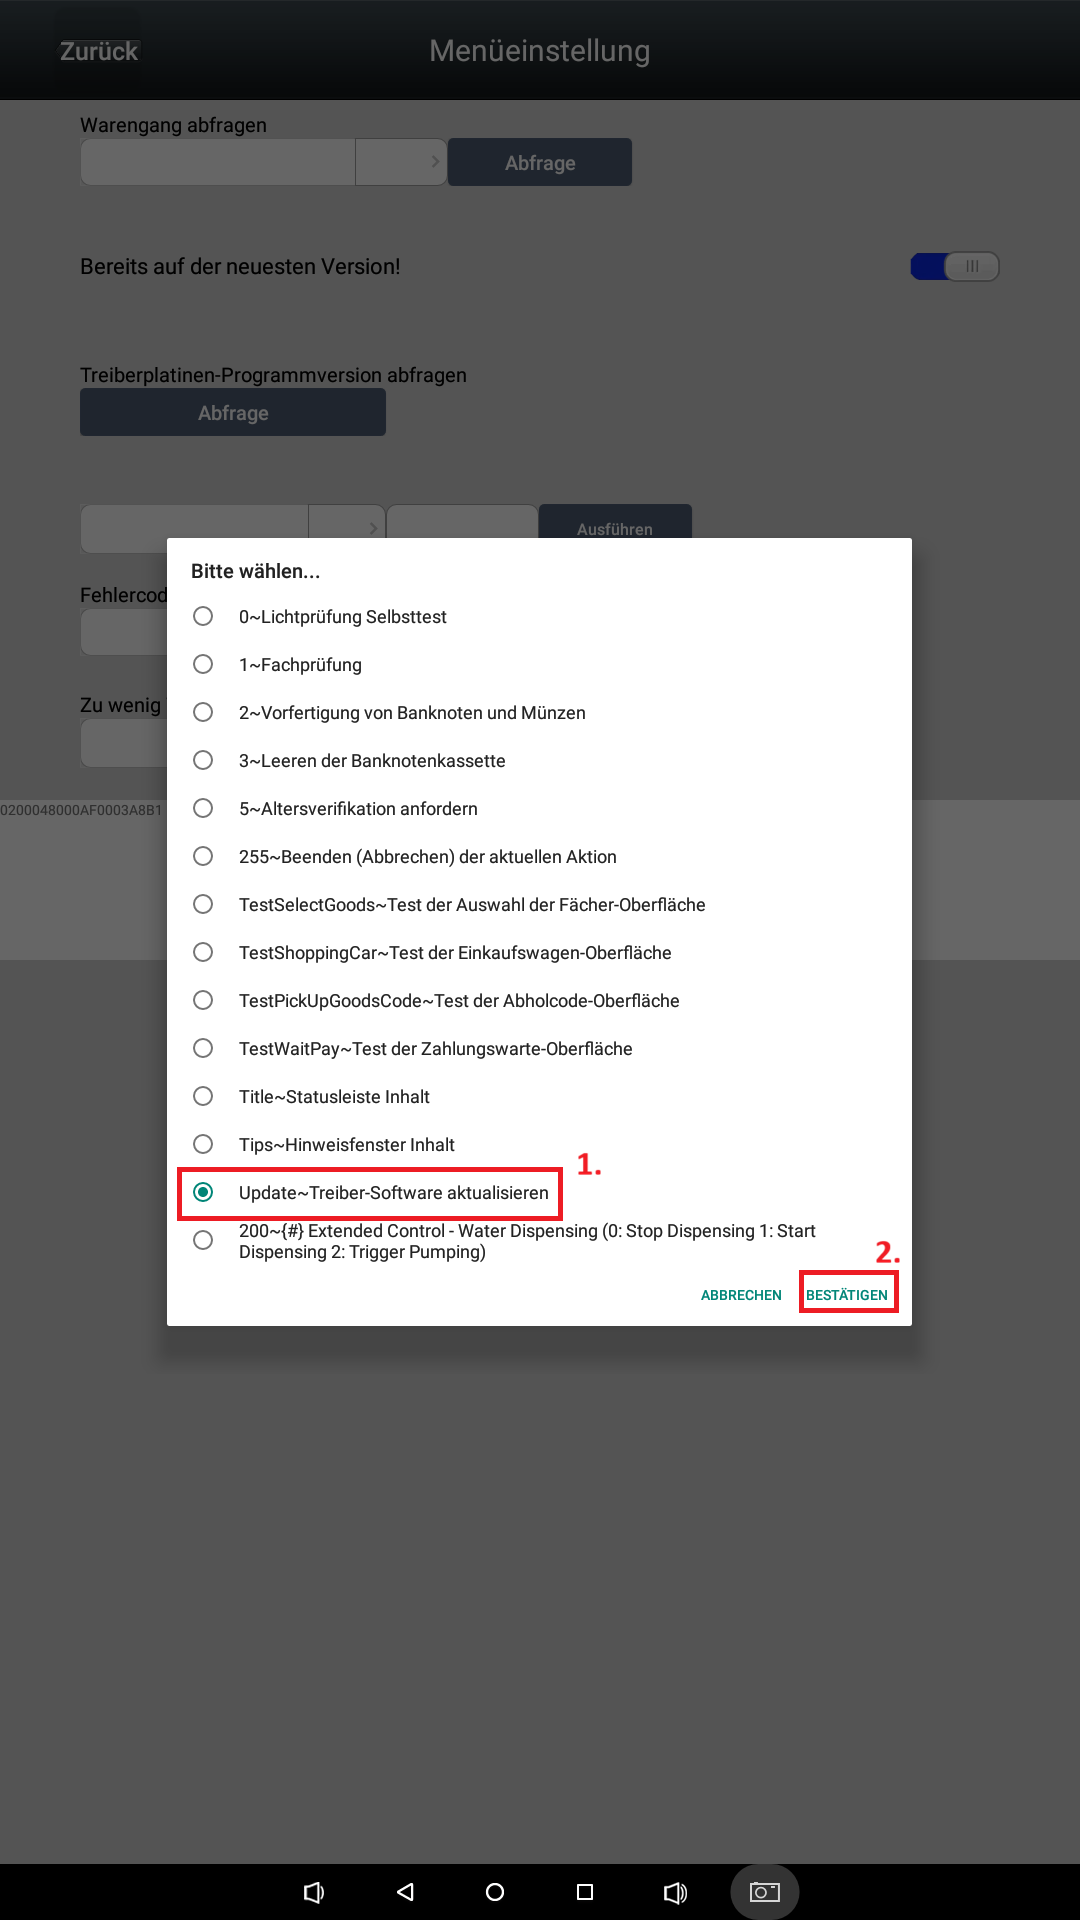
Update the driver software
In the drop-down menu, select Update Treibersoftware aktualisieren (update driver software) and confirm.
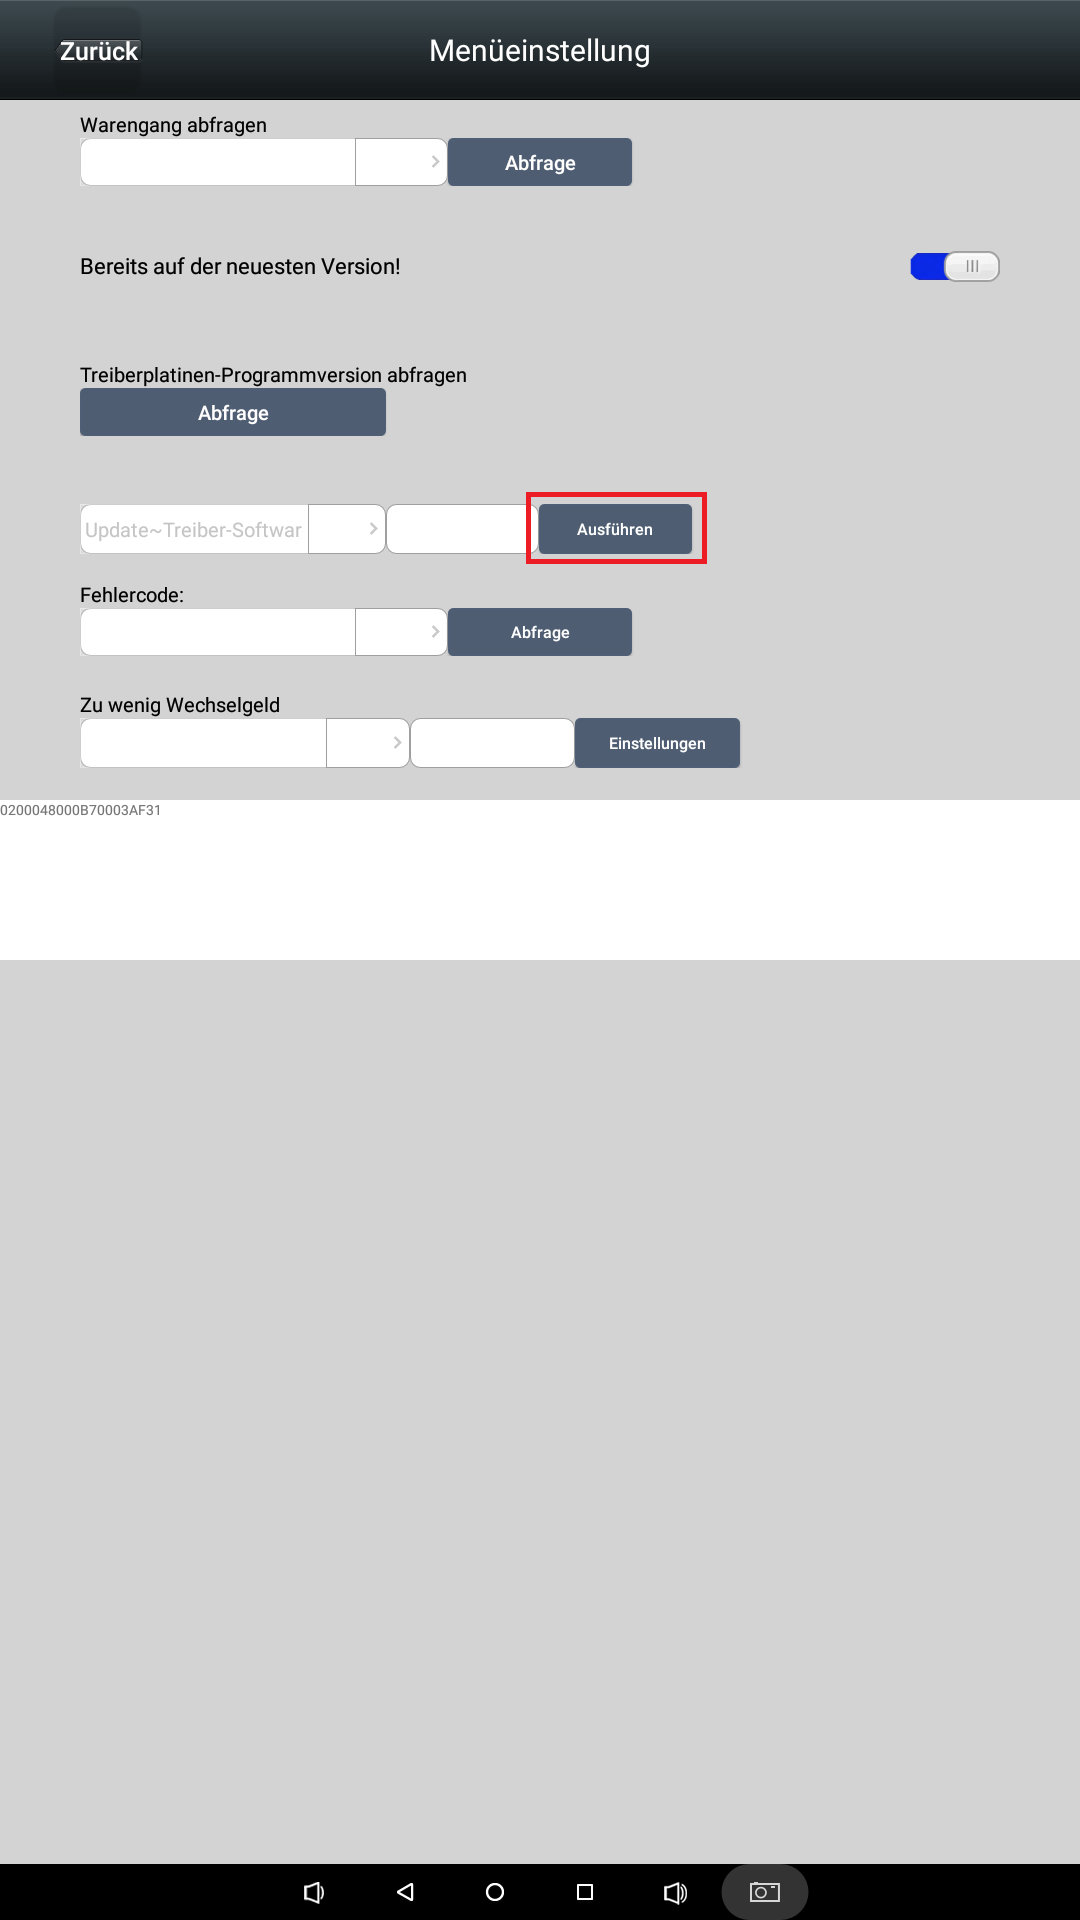
Run the update
In the updater, press Ausführen (run).
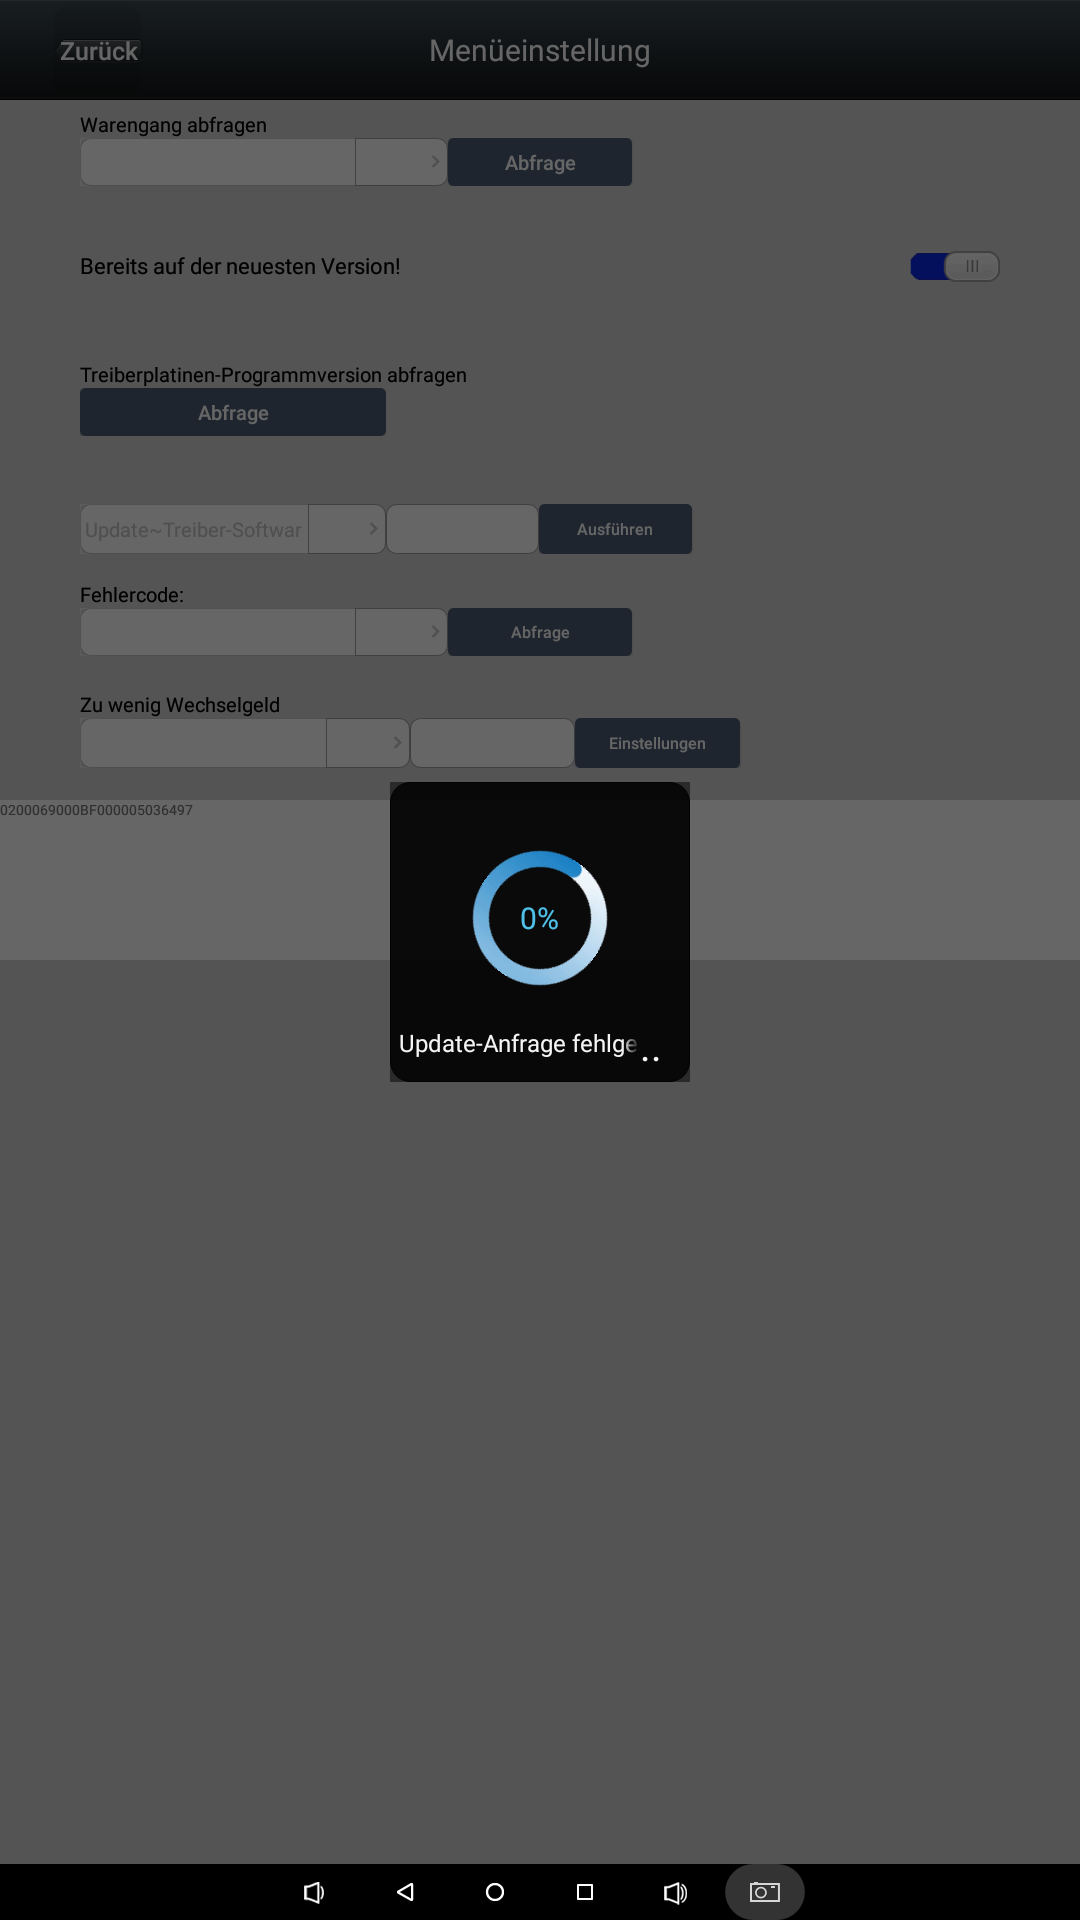
Wait for the update
A pop-up appears. After a successful update the machine emits acoustic signals and switches back automatically – the update is then finished.
Storefront update (TCN shop system)
Insert the USB stick
Insert the USB stick into the machine. Make sure the stick contains only the update files and nothing else.
Open the backend management
Open the menu Backend Management by tapping repeatedly on the top left corner.
Open the Android settings
Select the submenu Android Einstellungen (Android settings).
Open the ES browser
Select ES-Browser.
Open the menu
In the ES browser, at the top left press the three bars.
Choose the device portal
Select Geräteportal (device portal) in the menu.
Select the USB stick
Select the USB stick. 0 is always the internal SD card; the stick is below it.
Copy the storefront update
Select the storefront update by pressing and holding it, then copy it.
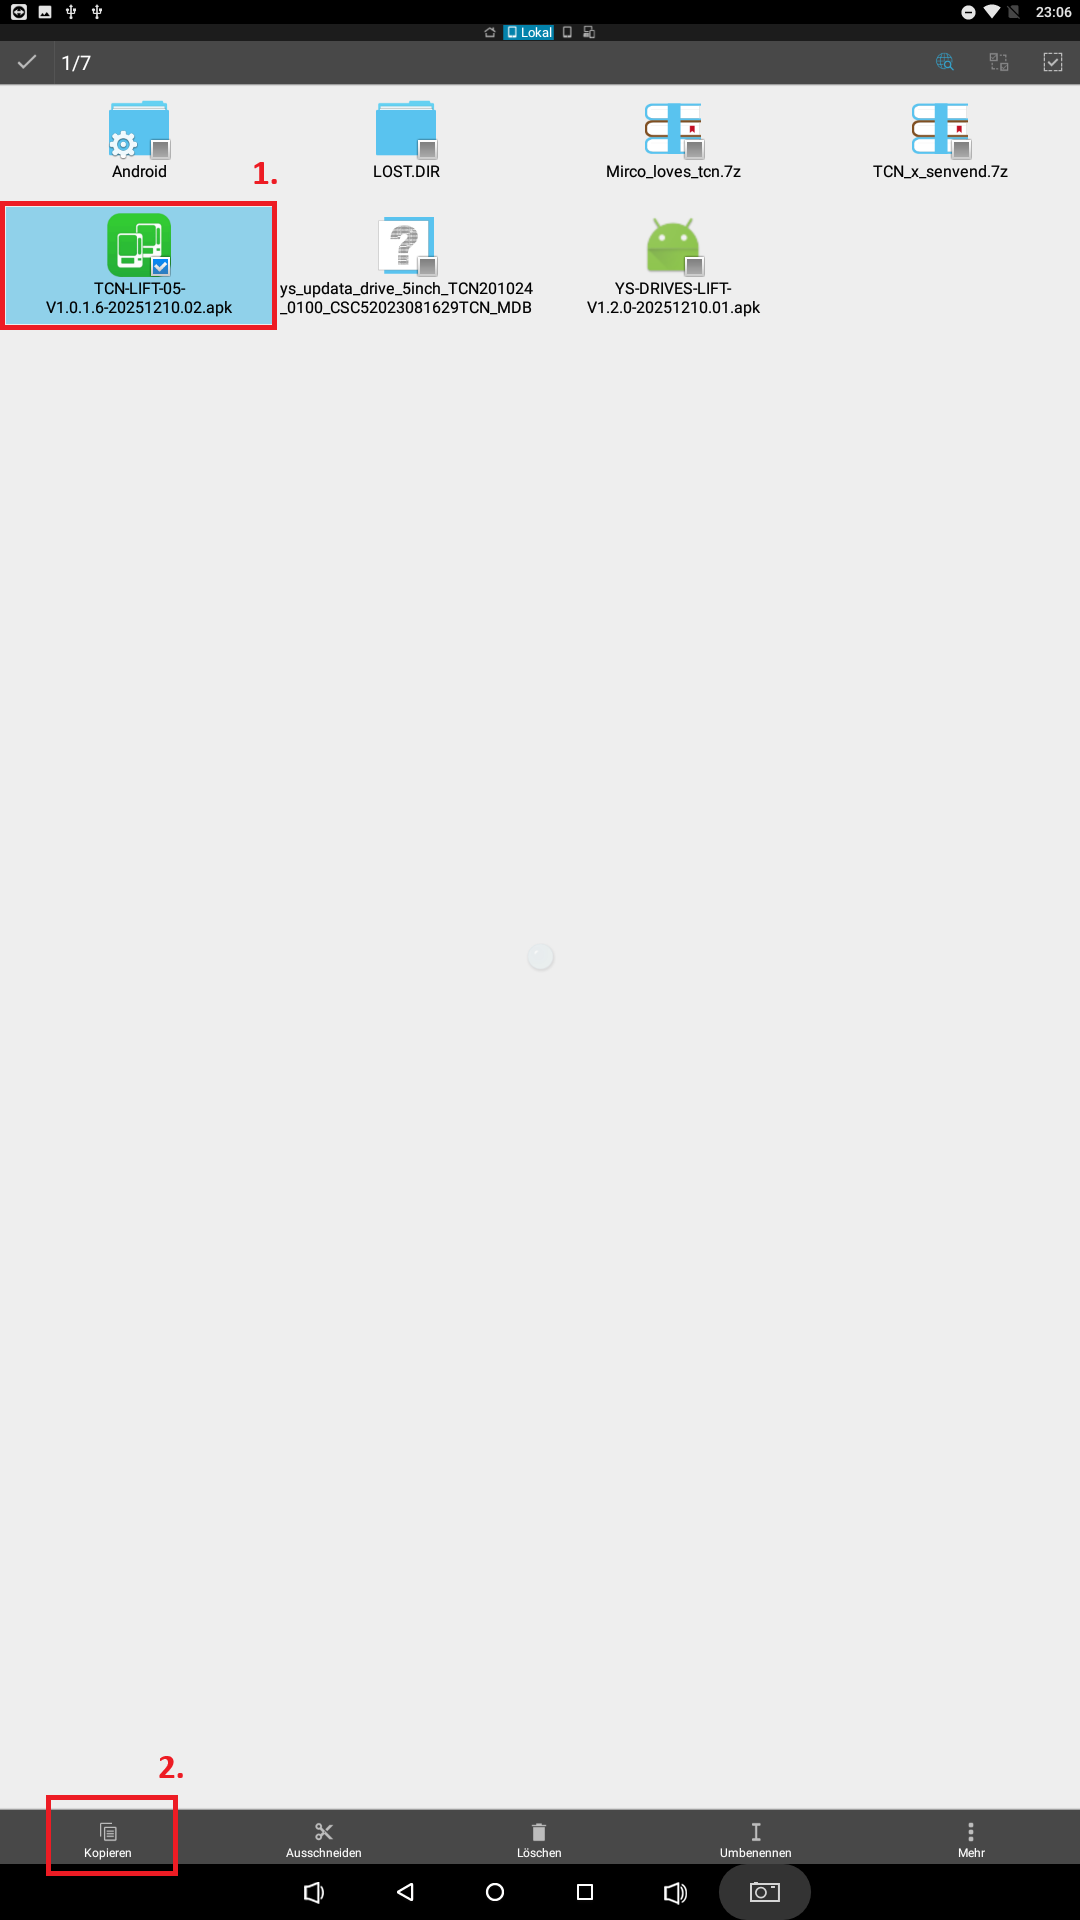
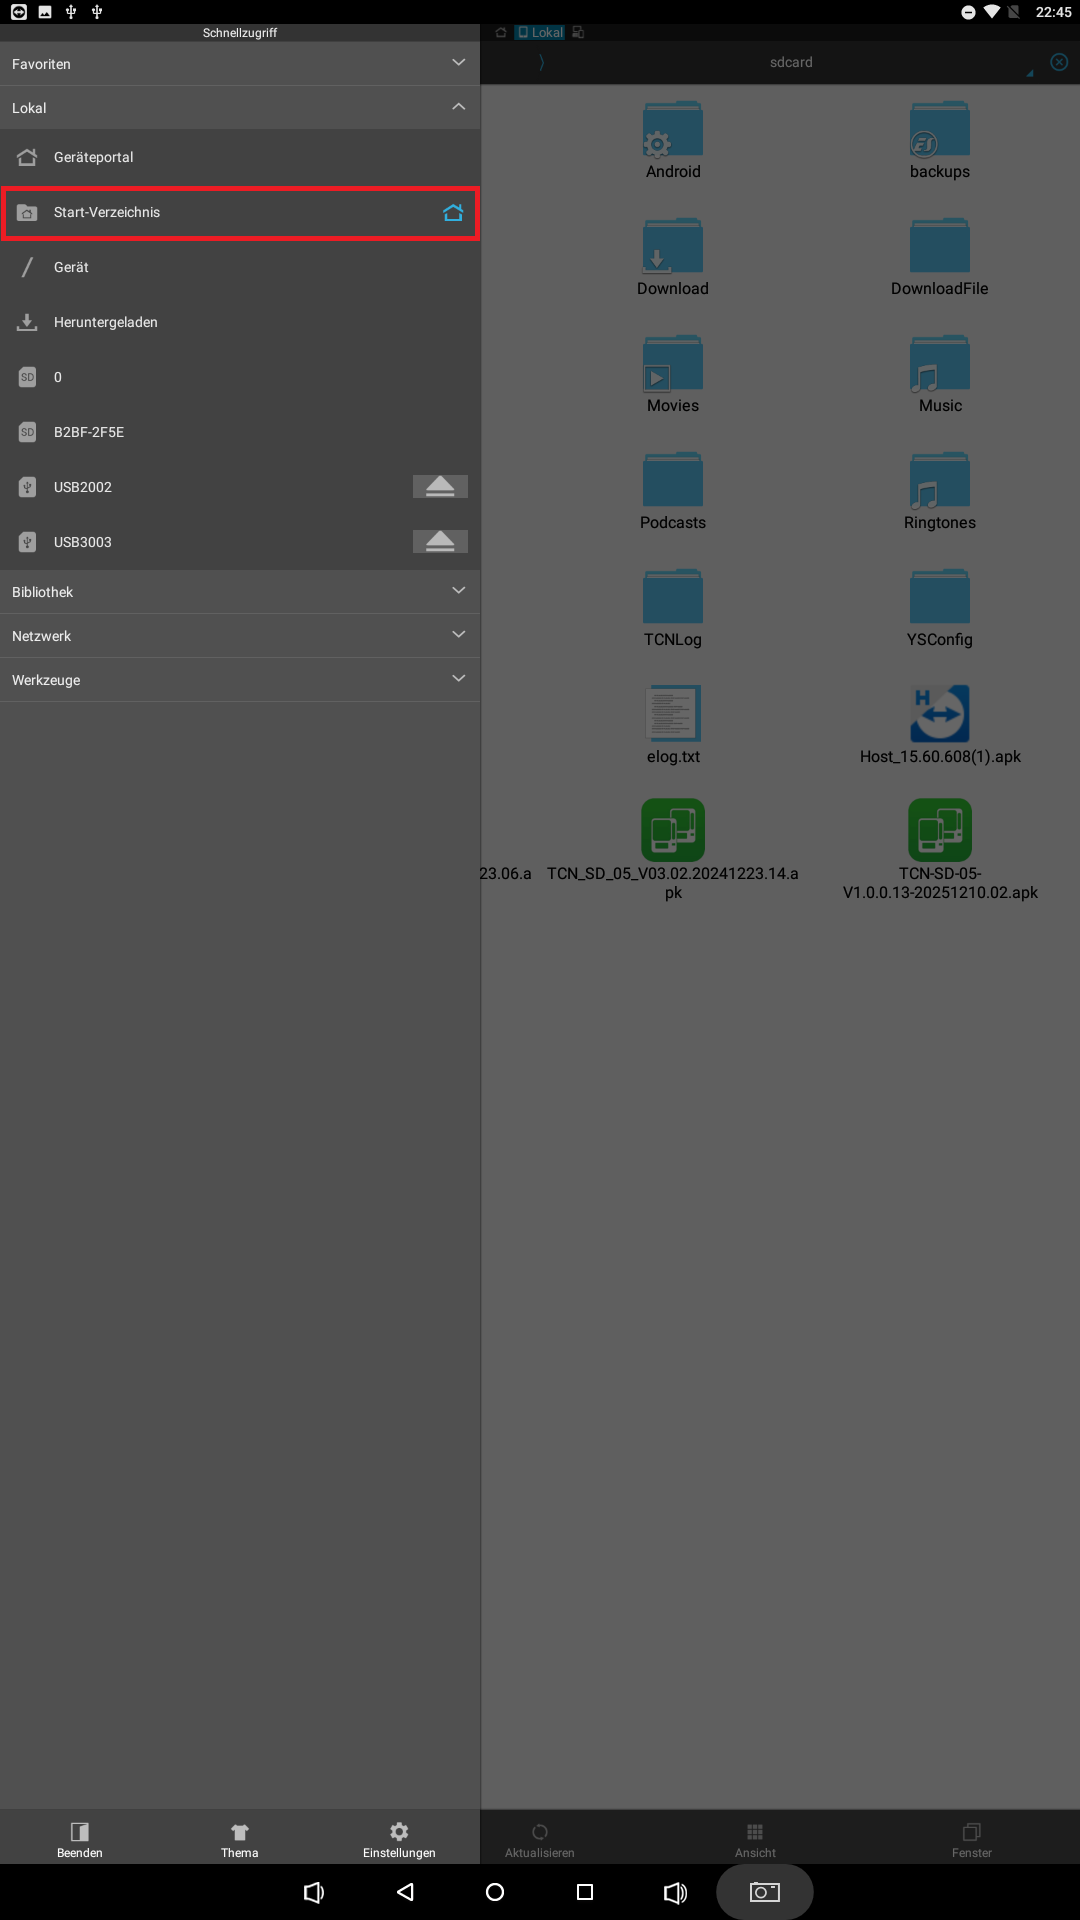
Switch to the root directory
Select the three bars at the top left again and switch to the Start-Verzeichnis (root directory).
Paste the file
In the root directory, press Einfügen (paste).
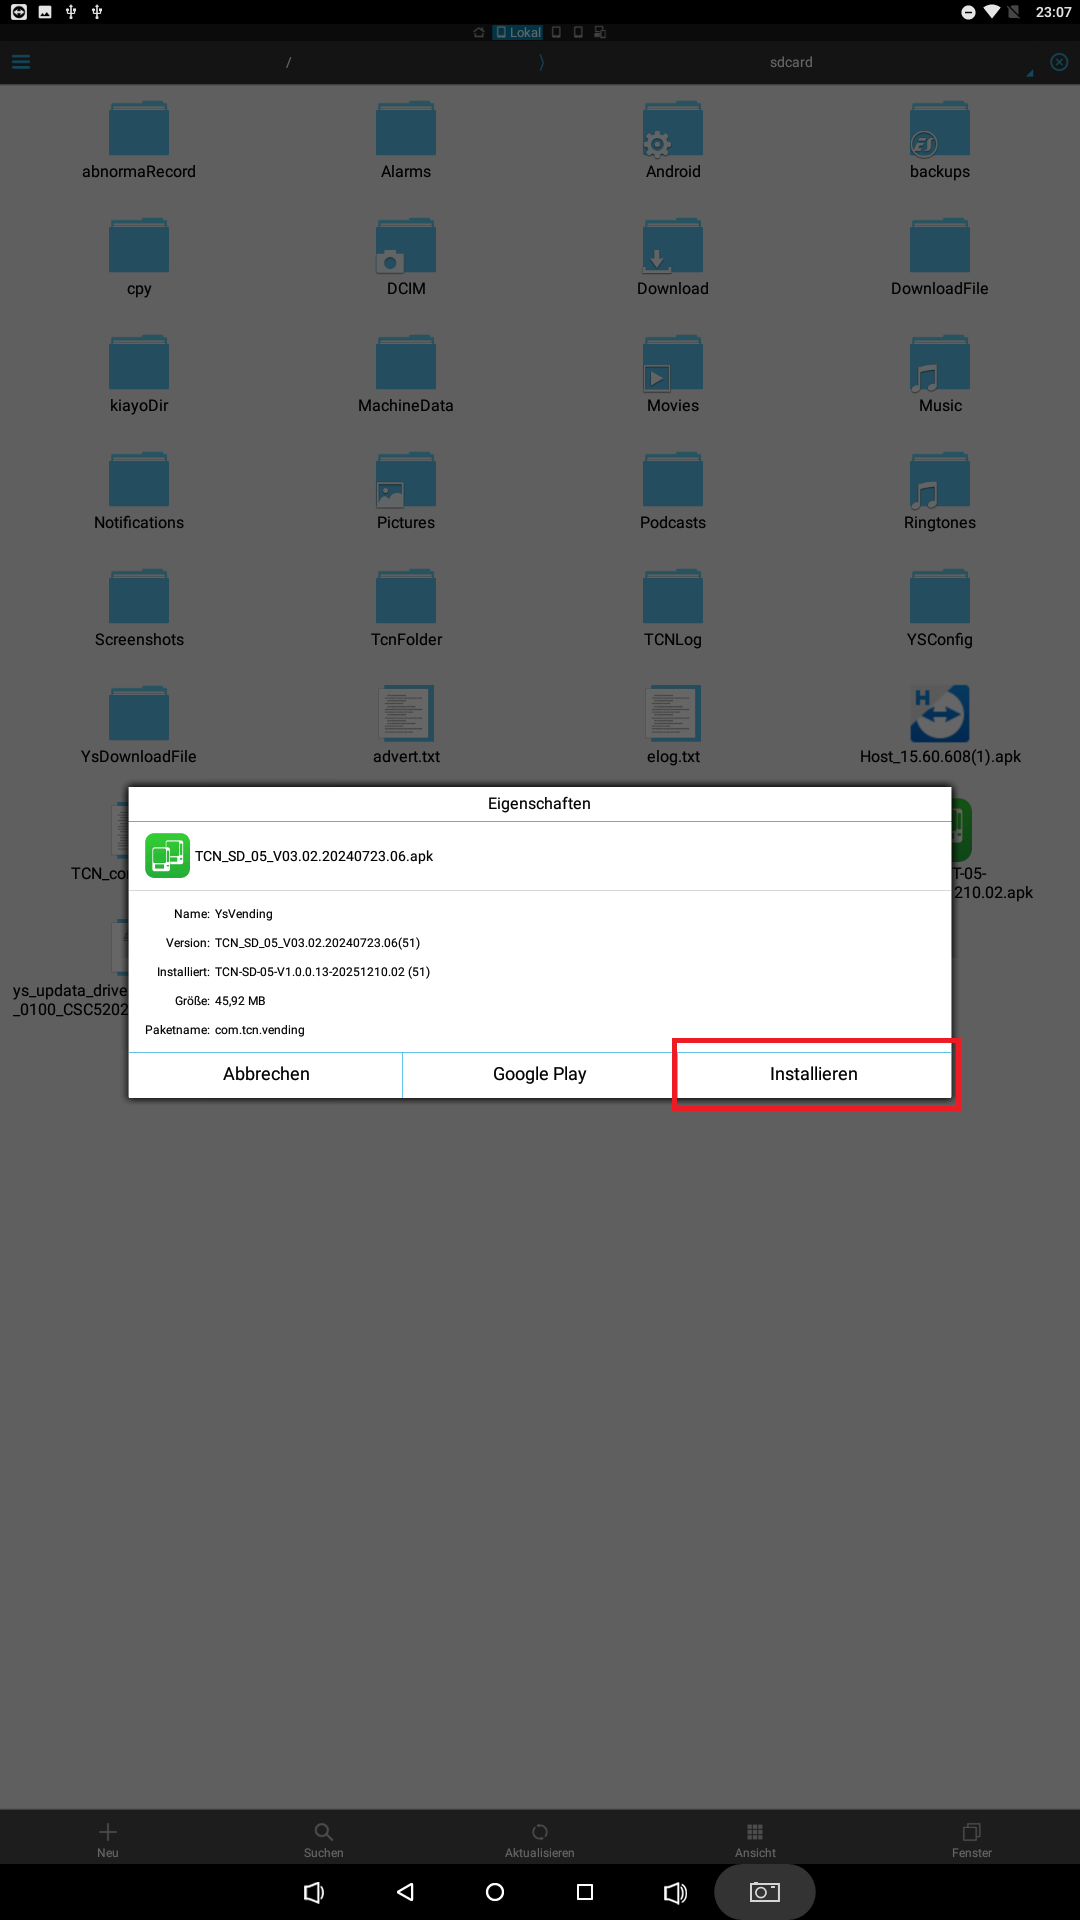
Install the APK
Then press the .apk update file and in the pop-up press Installieren (install).
Done
As soon as the update is installed, the Storefront app starts automatically. The update is then finished.
Device type 3
TCN Touch with SENVEND Storefront
TCN Touch machines can additionally be operated with SENVEND Storefront.
Info coming shortlyWe are currently putting together the information about SENVEND Storefront on TCN machines. Until then our support team will help you directly: help@senvend.com / +49 231 4499210.
Not sure which device type you have?
Send us a photo of the control panel – we will tell you which settings apply to your machine.



TCN
Settings for your TCN vending machine
Which steps you need depends on the control panel of your TCN machine. First choose your device type – below it you will find the settings and, where needed, the update guides.
Device type 1
TCN with keypad
These settings apply to all TCN machines with a keypad from software version BT5M24052.35-V09.
Finding the software versionYou will find your software version in the standard menu under the menu tab Sys. Setting in the sub-item About this Machine.
Settings on the machine
Open the machine
Open your machine.
Open the standard menu
Open the standard menu with the password 000000 and confirm with Enter.
Set the parameter
Select the menu tab Sale_Payment, then the sub-item Set IC Card Reader:
Restart the machine
Switch the machine off at the main switch and then on again.
Then configure the following settings in the SENVEND APP my.senvend and press Save:
Shopping cart and multiple vendUsing the shopping cart function or multiple vend is currently not recommended.
Age verification
Minimum versionFor age verification the SENVEND app should be on at least version 1.3.15 or higher.
Open the machine
Open your machine.
Open the admin menu
Open the admin menu with the password 80515 and confirm with Enter.
Set the parameter
Set the following parameter:
Restart the machine
Switch the machine off at the main switch and then on again.
Only one system at a timeTwo different age verification systems cannot be used in parallel – for example SENVEND and an external age verification system.
Then configure the following settings in the SENVEND APP my.senvend and press Save:
Updating the keypad machine
If your machine has an older software version, the update runs via TCN aftersales service:
Insert a SIM card
Insert a SIM card without a PIN into your machine.
Contact TCN aftersales
Message TCN aftersales on WhatsApp that you need an update and tell them your machine ID as well. You will find the machine ID in the machine menu under About this Machine.
Device type 2
TCN Touch
These settings apply to all TCN machines with a large touch display.
Settings on the touch display
Activate MDB payment
Open the backend management
Go to Backend-Management.
Open the payment methods
In the menu on the left, press the menu item Zahlungsmethoden einstellen (set payment methods).
Choose the submenu
Select the submenu item Häufig verwendete Zahlungsmethoden (frequently used payment methods).
Activate MDB
Activate MDB (including cash payment and credit card payment) with the slider.
Activating or deactivating age verification
Only activate if neededOnly activate this setting if you want to use age verification. If not, check that the following settings are deactivated.
Open the backend management
Go to Backend-Management.
Open the payment methods
Press the menu item Zahlungsmethoden einstellen (set payment methods).
Choose the submenu
Select the submenu item Altersverifikation (age verification).
Activate age verification
Activate Altersverifikation (age verification) with the slider.
Choose the verification method
Select MDB as the verification method.
Restart afterwardsAfter making these settings we recommend restarting the whole machine.
Updates for the touch machine
Only for touch machines with a liftThe updates are currently only available for touch machines with a lift – and only the tile interface works.
Here you will find the current firmware files:
MDB-Firmware Touch Touch firmware (TCN shop system)
Not the SENVEND StorefrontThe storefront update described here refers to the TCN shop system – not to SENVEND Storefront. The guides for SENVEND Storefront will follow later.
Can't find the settings?If individual settings for the MDB update cannot be found, set the machine language for the update to Englisch (English). The options should then appear.
MDB update
Insert the USB stick
Insert the USB stick into the machine. Make sure the stick contains only the update files and nothing else.
Open the backend management
Open the menu Backend Management by tapping repeatedly on the top left corner.
Open the Android settings
Select the submenu Android Einstellungen (Android settings).
Open the ES browser
Select ES-Browser.
Open the menu
In the ES browser, at the top left press the three bars.
Choose the device portal
Select Geräteportal (device portal) in the menu.
Select the USB stick
Select the USB stick. 0 is always the internal SD card; the stick is below it.
Copy the MDB update
Select the MDB update by pressing and holding it, then copy it.
Switch to the root directory
Select the three bars at the top left again and switch to the Start-Verzeichnis (root directory).
Paste the file
In the root directory, press Einfügen (paste).
Back to the backend management
Press the X at the top right until the backend management appears again.
Open the payment methods
In the backend management, go to Zahlungsmethoden einstellen (set payment methods).
Open the update menu
Tap several times on MDB until the update menu appears.
Select the field
In the updater, select the highlighted field.
Update the driver software
In the drop-down menu, select Update Treibersoftware aktualisieren (update driver software) and confirm.
Run the update
In the updater, press Ausführen (run).
Wait for the update
A pop-up appears. After a successful update the machine emits acoustic signals and switches back automatically – the update is then finished.
Storefront update (TCN shop system)
Insert the USB stick
Insert the USB stick into the machine. Make sure the stick contains only the update files and nothing else.
Open the backend management
Open the menu Backend Management by tapping repeatedly on the top left corner.
Open the Android settings
Select the submenu Android Einstellungen (Android settings).
Open the ES browser
Select ES-Browser.
Open the menu
In the ES browser, at the top left press the three bars.
Choose the device portal
Select Geräteportal (device portal) in the menu.
Select the USB stick
Select the USB stick. 0 is always the internal SD card; the stick is below it.
Copy the storefront update
Select the storefront update by pressing and holding it, then copy it.
Switch to the root directory
Select the three bars at the top left again and switch to the Start-Verzeichnis (root directory).
Paste the file
In the root directory, press Einfügen (paste).
Install the APK
Then press the .apk update file and in the pop-up press Installieren (install).
Done
As soon as the update is installed, the Storefront app starts automatically. The update is then finished.
Device type 3
TCN Touch with SENVEND Storefront
TCN Touch machines can additionally be operated with SENVEND Storefront.
Info coming shortlyWe are currently putting together the information about SENVEND Storefront on TCN machines. Until then our support team will help you directly: help@senvend.com / +49 231 4499210.
Not sure which device type you have?
Send us a photo of the control panel – we will tell you which settings apply to your machine.