SandenVendo
Settings for SandenVendo machines
Which settings you need depends on your machine's controller. First choose your device type – the matching steps are shown underneath.
Tested software versionsWe have tried out the software versions listed on this page at SENVEND ourselves – the settings described here work with these versions.
Device type 1
SandenVendo with SVE01 board
These settings apply to all SandenVendo machines with the SVE01 board, which is fitted in machines with a mechanical keypad. The USB port is located on the board.
For example these machinesG-Snack Standard, G-Snack Design, G-Snack Budget, G-Snack Evolution, Back-Loader, G-Drink Standard, G-Drink Design, B&C Standard and B&C Design.
Check the software version and update if necessary
Make sure that at least software version 2.61 is installed on the machine.
SVE01 firmware 2.61 SVE01 firmware 2.62
Version 2.62 brings bug fixes in the Remote Vend area. Here you can find an explainer video about the update.
Open the menu
Open the General Settings menu.
Enter the key sequence
Press the following keys on the machine one after another: 4 – 2 – 3 – 1 – 4
Set MDB selection number to YES
So that the MDB number in your telemetry matches the selection number in your machine, you have to make this setting on the SandenVendo. This setting is also important for Remote Vend.
Set the payment settings
Go to the payment settings and set the following parameters:
Exit the menu
Leave the menu with the Back key until you are completely out of the menu.
Restart the machine
Switch the machine off at the main switch and then on again.
Setting up age verification
Open the menu
Open the General Settings menu and press one after another: 4 – 2 – 3 – 1 – 4
“Time age query” menu
Go to the Time age query menu and set the following parameters:
Age verification is then active around the clock.
Exit the menu
Press the Back key as often as needed until you are back in the General Settings menu.
Set the age limit
Choose the menu item Age limit and enter the age limit you want, for example 18 for products for ages 18 and over.
Activate the age check per product
Go to the main menu and then to G-Snack and Set age check per product.
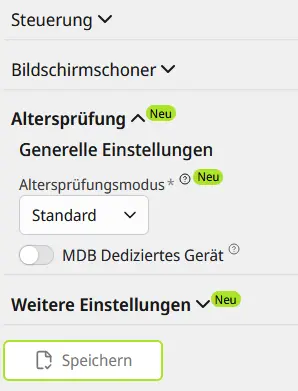
Then make the following settings in the SENVEND APP my.senvend and press Save:
Device type 2
SandenVendo Touch (Linux)
These settings apply to all SandenVendo machines with the EMA206 board, which is fitted in machines with a touch display.
For example these machinesG-Snack Outdoor Touch, G-Snack Design Touch, G-Drink Outdoor Touch, G-Drink Design Touch and G-Frozen.
Check the software version and update if necessary
Make sure that at least software version 003-017 is installed on the machine, and carry out an update if necessary.
Firmware for EMA 206 Firmware for DMX8 18" Touch
- Download the firmware and unpack the ZIP file so that only the .7z file is left.
- Copy the .7z file onto a USB stick.
- Switch the machine off. Plug the stick into the USB port on the board behind the display and then select the USB port on the outside.
- Switch the machine back on and press install.
Open the settings
Go into your machine's settings by pressing the red programming button.
Payment and price
Select Payment and price.
Set MDB selection number to YES
So that the MDB number in your telemetry matches the selection number in your machine, you have to make this setting on the SandenVendo. This setting is also important for Remote Vend.
Payment system
Select Payment system.
Set the parameters
Exit the menu
Press the Back key as often as needed until you are back in the General Settings menu.
Restart the machine
Switch the machine off and on again.
Device type 3
Brain (Linux)
These settings apply to SandenVendo machines with Brain control.
Information coming soonWe are currently putting together the settings for this device type. Until then our support team will help you directly: help@senvend.com or +49 231 4499210.
Device type 4
Brain with SENVEND Storefront
These settings apply to machines with Brain control that are additionally operated with SENVEND Storefront.
Additional hardware requiredOperating a machine with SENVEND Storefront currently requires additional hardware in the machine. Our support team will tell you which components you need.
Information coming soonWe are currently putting together the settings for this device type. Until then our support team will help you directly: help@senvend.com or +49 231 4499210.
Device type 5
Sanden Vendo with SF01 board (EPROM)
These settings apply to SandenVendo machines with the SF01 board (EPROM). The EPROM machines are split into G-Drink and G-Snack.
Information coming soonWe are currently putting together the settings for this device type. Until then our support team will help you directly: help@senvend.com or +49 231 4499210.
SF01 G-Drink
Settings coming soon.
SF01 G-Snack
Settings coming soon.
Not sure which device type you have?
Send us a photo of the board or the display – we will tell you which settings apply to your machine.



SandenVendo
Settings for SandenVendo machines
Which settings you need depends on your machine's controller. First choose your device type – the matching steps are shown underneath.
Tested software versionsWe have tried out the software versions listed on this page at SENVEND ourselves – the settings described here work with these versions.
Device type 1
SandenVendo with SVE01 board
These settings apply to all SandenVendo machines with the SVE01 board, which is fitted in machines with a mechanical keypad. The USB port is located on the board.
For example these machinesG-Snack Standard, G-Snack Design, G-Snack Budget, G-Snack Evolution, Back-Loader, G-Drink Standard, G-Drink Design, B&C Standard and B&C Design.
Check the software version and update if necessary
Make sure that at least software version 2.61 is installed on the machine.
SVE01 firmware 2.61 SVE01 firmware 2.62
Version 2.62 brings bug fixes in the Remote Vend area. Here you can find an explainer video about the update.
Open the menu
Open the General Settings menu.
Enter the key sequence
Press the following keys on the machine one after another: 4 – 2 – 3 – 1 – 4
Set MDB selection number to YES
So that the MDB number in your telemetry matches the selection number in your machine, you have to make this setting on the SandenVendo. This setting is also important for Remote Vend.
Set the payment settings
Go to the payment settings and set the following parameters:
Exit the menu
Leave the menu with the Back key until you are completely out of the menu.
Restart the machine
Switch the machine off at the main switch and then on again.
Setting up age verification
Open the menu
Open the General Settings menu and press one after another: 4 – 2 – 3 – 1 – 4
“Time age query” menu
Go to the Time age query menu and set the following parameters:
Age verification is then active around the clock.
Exit the menu
Press the Back key as often as needed until you are back in the General Settings menu.
Set the age limit
Choose the menu item Age limit and enter the age limit you want, for example 18 for products for ages 18 and over.
Activate the age check per product
Go to the main menu and then to G-Snack and Set age check per product.
Then make the following settings in the SENVEND APP my.senvend and press Save:
Device type 2
SandenVendo Touch (Linux)
These settings apply to all SandenVendo machines with the EMA206 board, which is fitted in machines with a touch display.
For example these machinesG-Snack Outdoor Touch, G-Snack Design Touch, G-Drink Outdoor Touch, G-Drink Design Touch and G-Frozen.
Check the software version and update if necessary
Make sure that at least software version 003-017 is installed on the machine, and carry out an update if necessary.
Firmware for EMA 206 Firmware for DMX8 18" Touch
- Download the firmware and unpack the ZIP file so that only the .7z file is left.
- Copy the .7z file onto a USB stick.
- Switch the machine off. Plug the stick into the USB port on the board behind the display and then select the USB port on the outside.
- Switch the machine back on and press install.
Open the settings
Go into your machine's settings by pressing the red programming button.
Payment and price
Select Payment and price.
Set MDB selection number to YES
So that the MDB number in your telemetry matches the selection number in your machine, you have to make this setting on the SandenVendo. This setting is also important for Remote Vend.
Payment system
Select Payment system.
Set the parameters
Exit the menu
Press the Back key as often as needed until you are back in the General Settings menu.
Restart the machine
Switch the machine off and on again.
Device type 3
Brain (Linux)
These settings apply to SandenVendo machines with Brain control.
Information coming soonWe are currently putting together the settings for this device type. Until then our support team will help you directly: help@senvend.com or +49 231 4499210.
Device type 4
Brain with SENVEND Storefront
These settings apply to machines with Brain control that are additionally operated with SENVEND Storefront.
Additional hardware requiredOperating a machine with SENVEND Storefront currently requires additional hardware in the machine. Our support team will tell you which components you need.
Information coming soonWe are currently putting together the settings for this device type. Until then our support team will help you directly: help@senvend.com or +49 231 4499210.
Device type 5
Sanden Vendo with SF01 board (EPROM)
These settings apply to SandenVendo machines with the SF01 board (EPROM). The EPROM machines are split into G-Drink and G-Snack.
Information coming soonWe are currently putting together the settings for this device type. Until then our support team will help you directly: help@senvend.com or +49 231 4499210.
SF01 G-Drink
Settings coming soon.
SF01 G-Snack
Settings coming soon.
Not sure which device type you have?
Send us a photo of the board or the display – we will tell you which settings apply to your machine.